Nextcloud integration setup
| Topic | Description |
|---|---|
| Required system versions | Version requirements to enable the integration |
| Set up the integration | Connect your Nextcloud and Nepenthes instances as an administrator |
| Reset OAuth values | Create and manage work package types. |
| Delete a Nextcloud file storage | Create and manage work package status. |
| Using the integration | Create and manage workflows for work packages in Nepenthes. |
Nepenthes offers close integration with Nextcloud to allow users to:
- Link files and folders stored in Nextcloud with Nepenthes work packages
- View, open and download files and folder linked to a work package via the Files tab
- View all work packages linked to a file
- View Nepenthes notifications via the Nextcloud dashboard
Note: This guide only covers the integration setup. Please go to our Nextcloud integration user guide to learn more about how to work with the Nextcloud integration.
Required system versions
Nepenthes makes significant efforts to ensure that the integration works with all the latest stable versions. We strongly recommend continuously updating all systems to the current stable version. This ensures access to the latest features and prompt fixes for any potential bugs.
- Nepenthes latest release.
- The latest version of the Nepenthes Integration Nextcloud app from the Nextcloud App Store.
- Nextcloud version in the latest
stableversion.- If you run Nextcloud in the community edition be careful to not blindly follow the update hints in the administration area of a Nextcloud instance, as they nudge you to use the
latestversion, which might not be the lateststableversion. We recommend to check the tags of Nextcloud's official Docker image. There you can see which version is currently the stable one. - If you installed Nextcloud via Docker then we advise you to pin it to a
stabletag.
- If you run Nextcloud in the community edition be careful to not blindly follow the update hints in the administration area of a Nextcloud instance, as they nudge you to use the
Set up the integration
Important: You need to have administrator privileges in both your Nextcloud and Nepenthes instances to set up this integration.
Watch this video to find out how to set up the Nextcloud integration as an Administrator and as a user.
1. Add the "Nepenthes Integration" app in Nextcloud and point it to your Nepenthes instance
Start by opening your Nextcloud instance as an administrator.
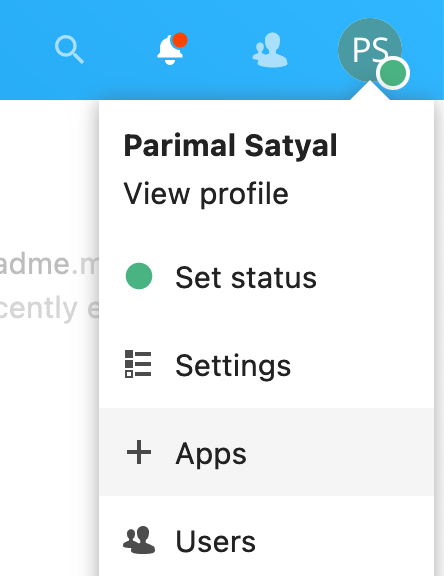
Navigate to the Nextcloud app store by clicking on your avatar in the top right corner → Apps.
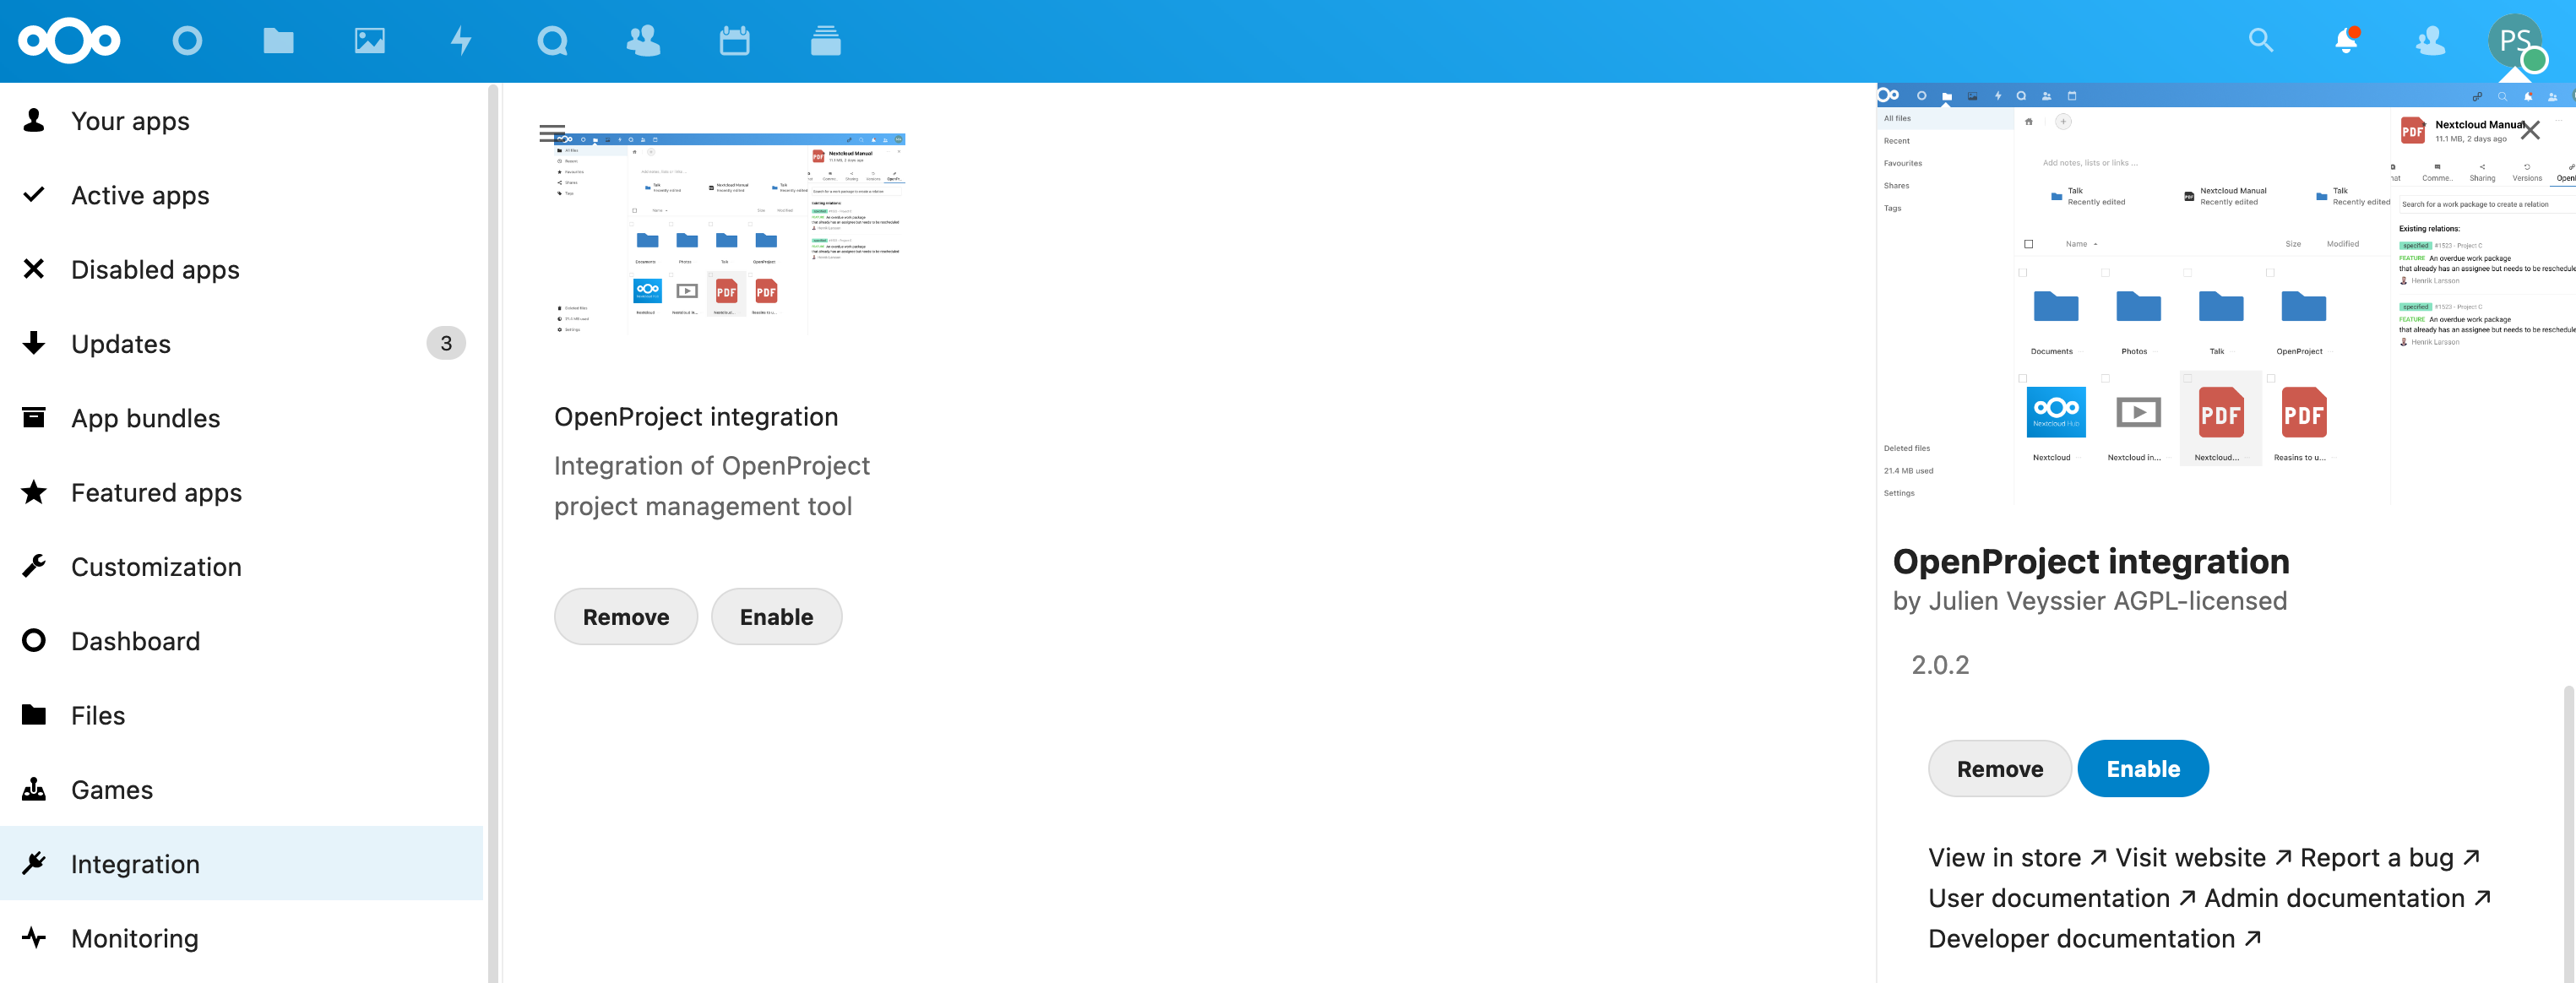
On the left menu, click on Integration and look for the "Nepenthes Integration" app.
You can also use the search field in the top right corner and type "Nepenthes" to find it. Once you have found the app, click the Download and enable button.
Once the Nepenthes Integration app is downloaded and enabled, navigate to the settings page by clicking on your avatar in the top right corner → Settings. On the left-side menu, click on Nepenthes Integration
In the configuration page that appears, you'll see a blank text field titled Nepenthes host. Enter the address of the Nepenthes instance you would like to connect with Nextcloud (including "https://").
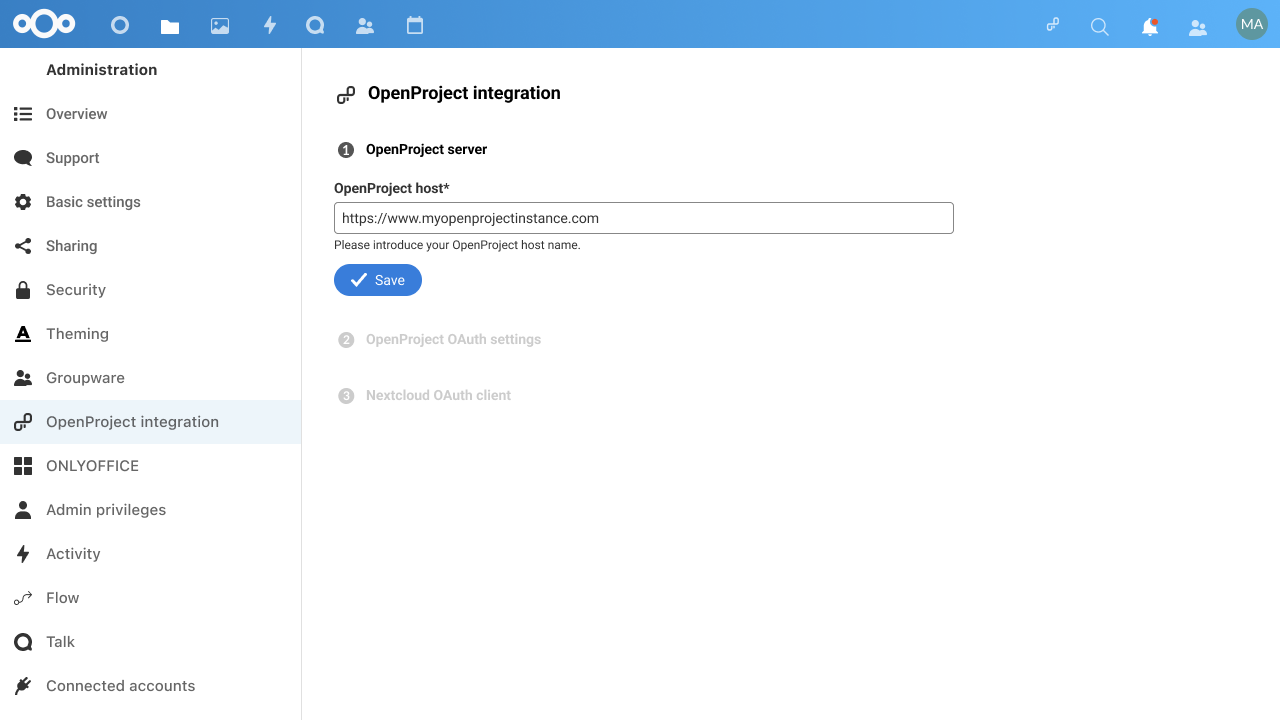
Click on the Save button.
Note: If the Nepenthes host cannot be added, you may check the Troubleshooting section at the bottom of this page
The next part of the setup will require you to enter Nepenthes OAuth values here, but before we do that, you will need to generate them in Nepenthes. To do so, navigate to your Nepenthes instance in a new browser tab.
2. Create a Nextcloud file storage in your Nepenthes instance
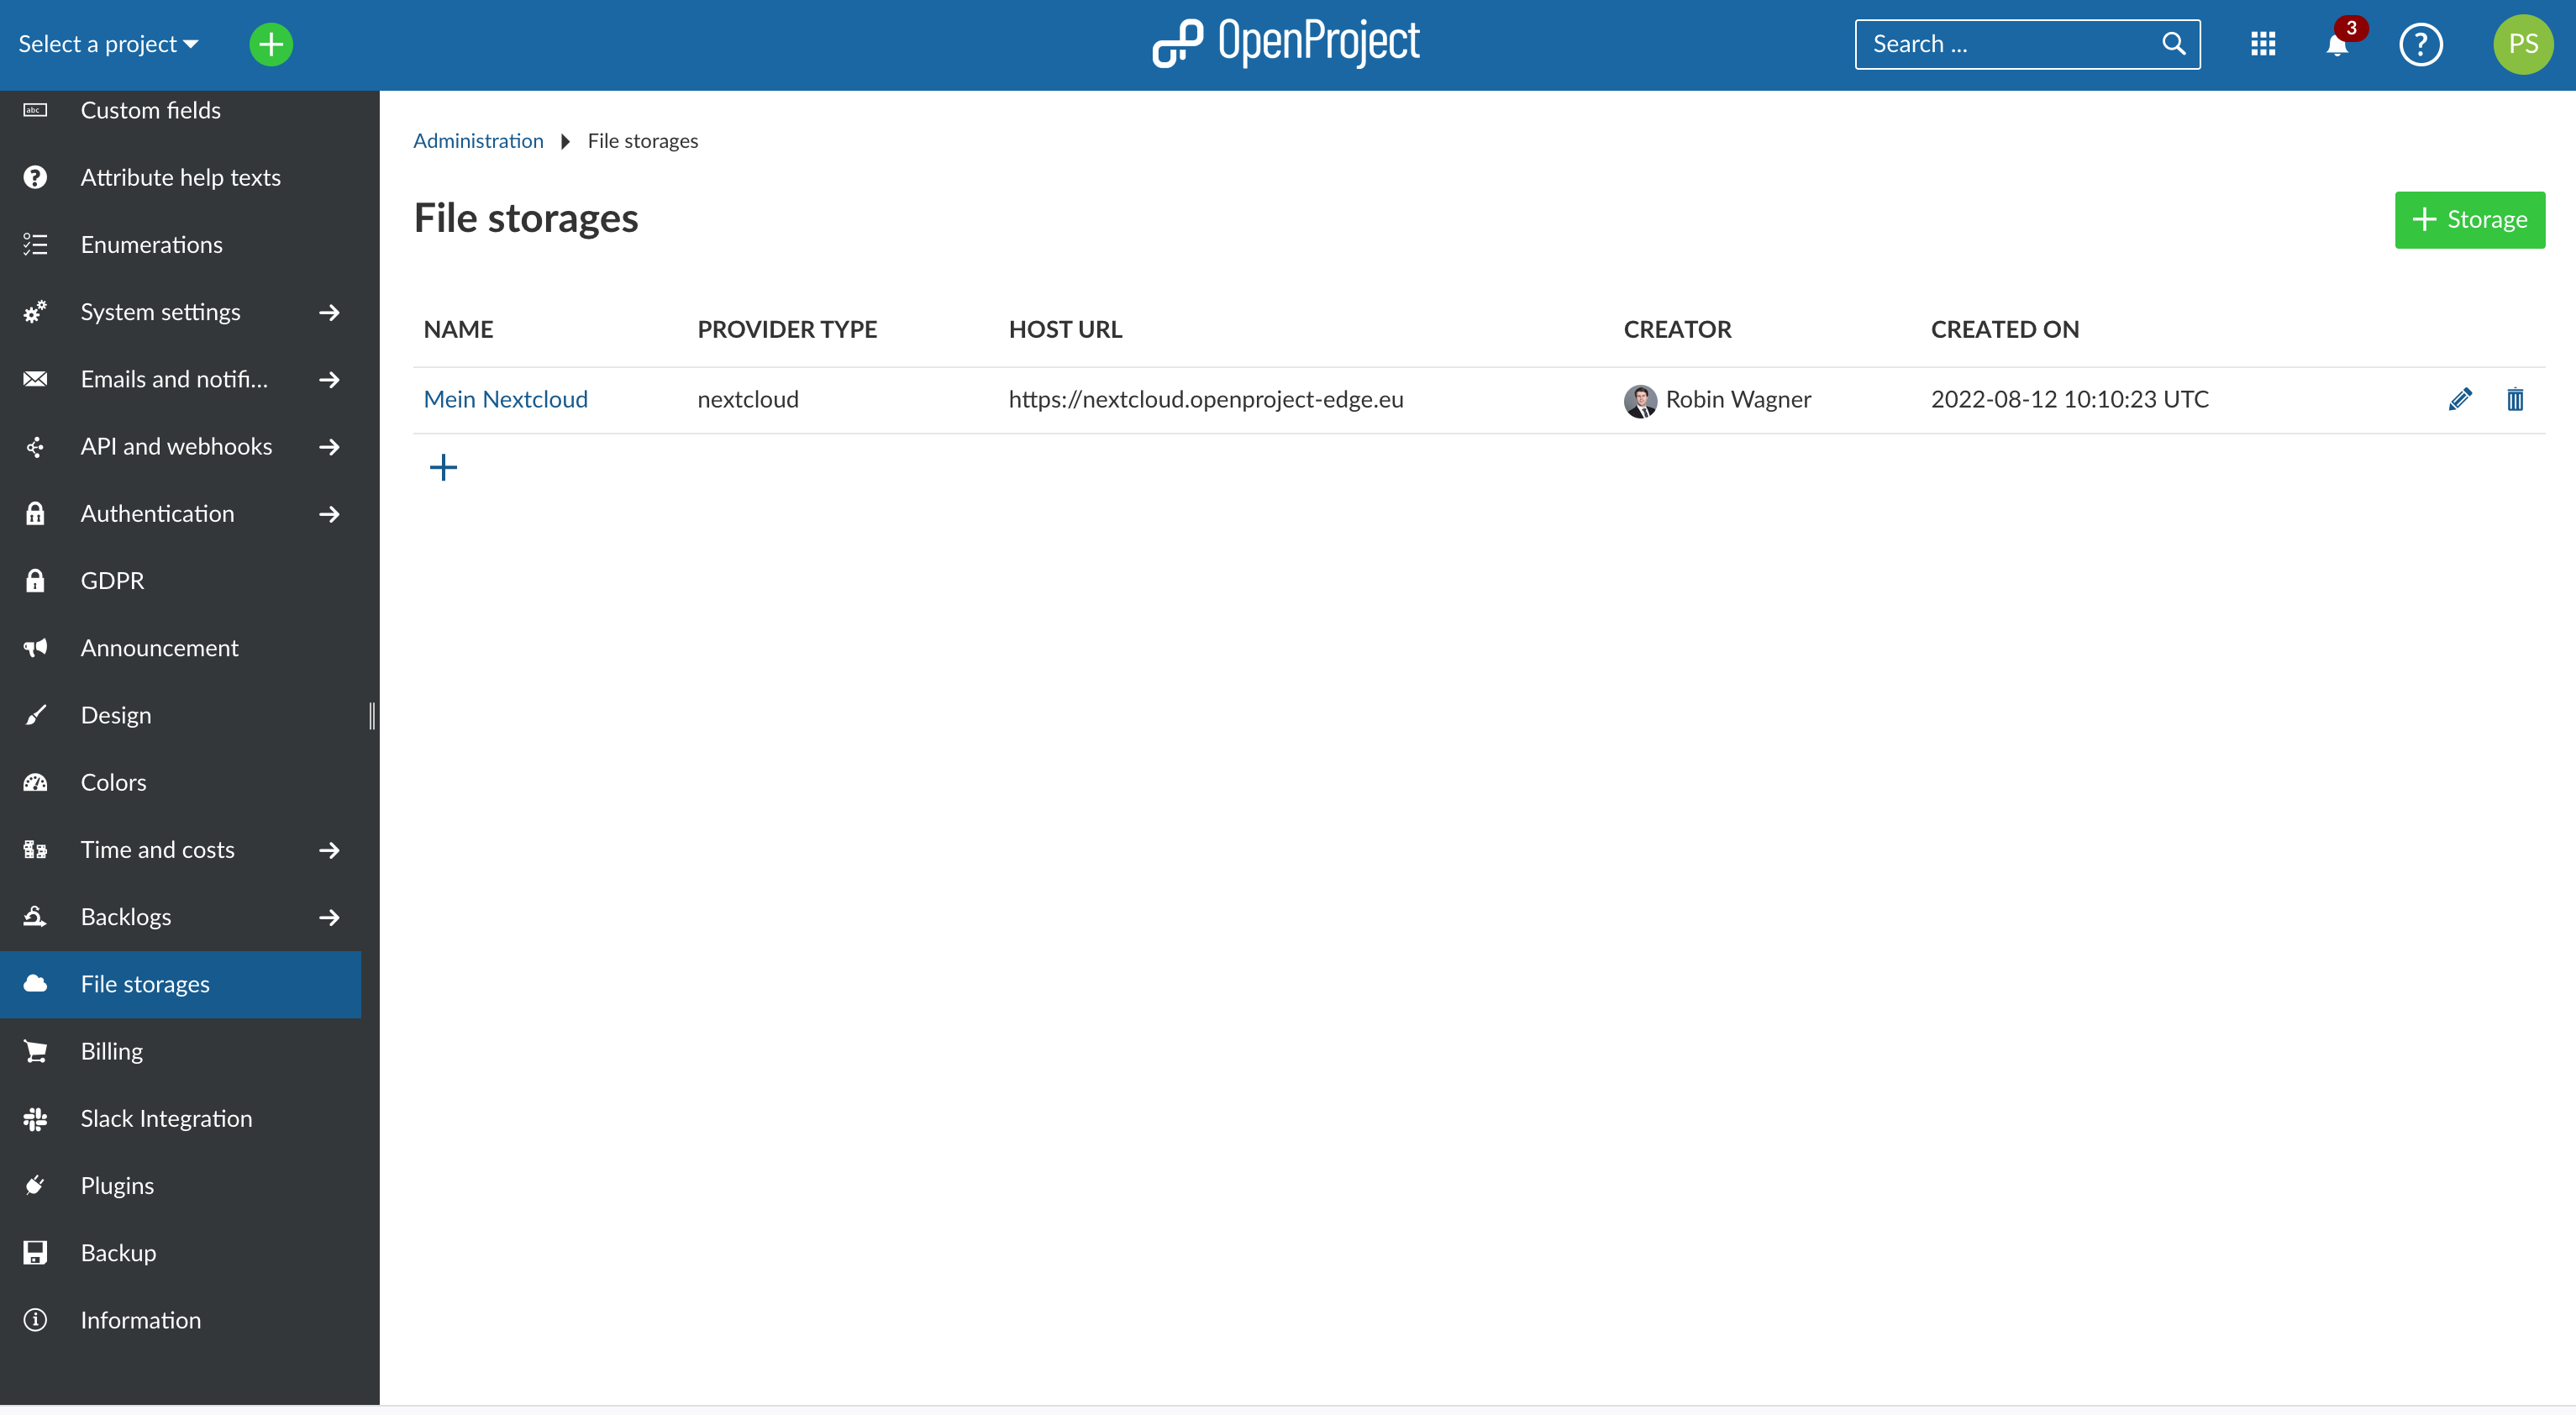
Navigate to your administration settings page by clicking on your avatar in the top right corner → Administration. From the side menu on the left, click on File storages.
Click on + Storage to add a new file storage.
A new page titled New storage will appear, where you will be able to configure your new Nextcloud storage.
By default, Provider type is set to Nextcloud. This does not need to be modified.
Give a name to this new storage. This will be visible to all users in all projects using this file storage. We highly recommended choosing a distinct name that allows users to differentiate it from any other file storages you may add in the future.
Next, enter the Host URL of your Nextcloud instance. This is simply the address of your Nextcloud instance, including the "https://".
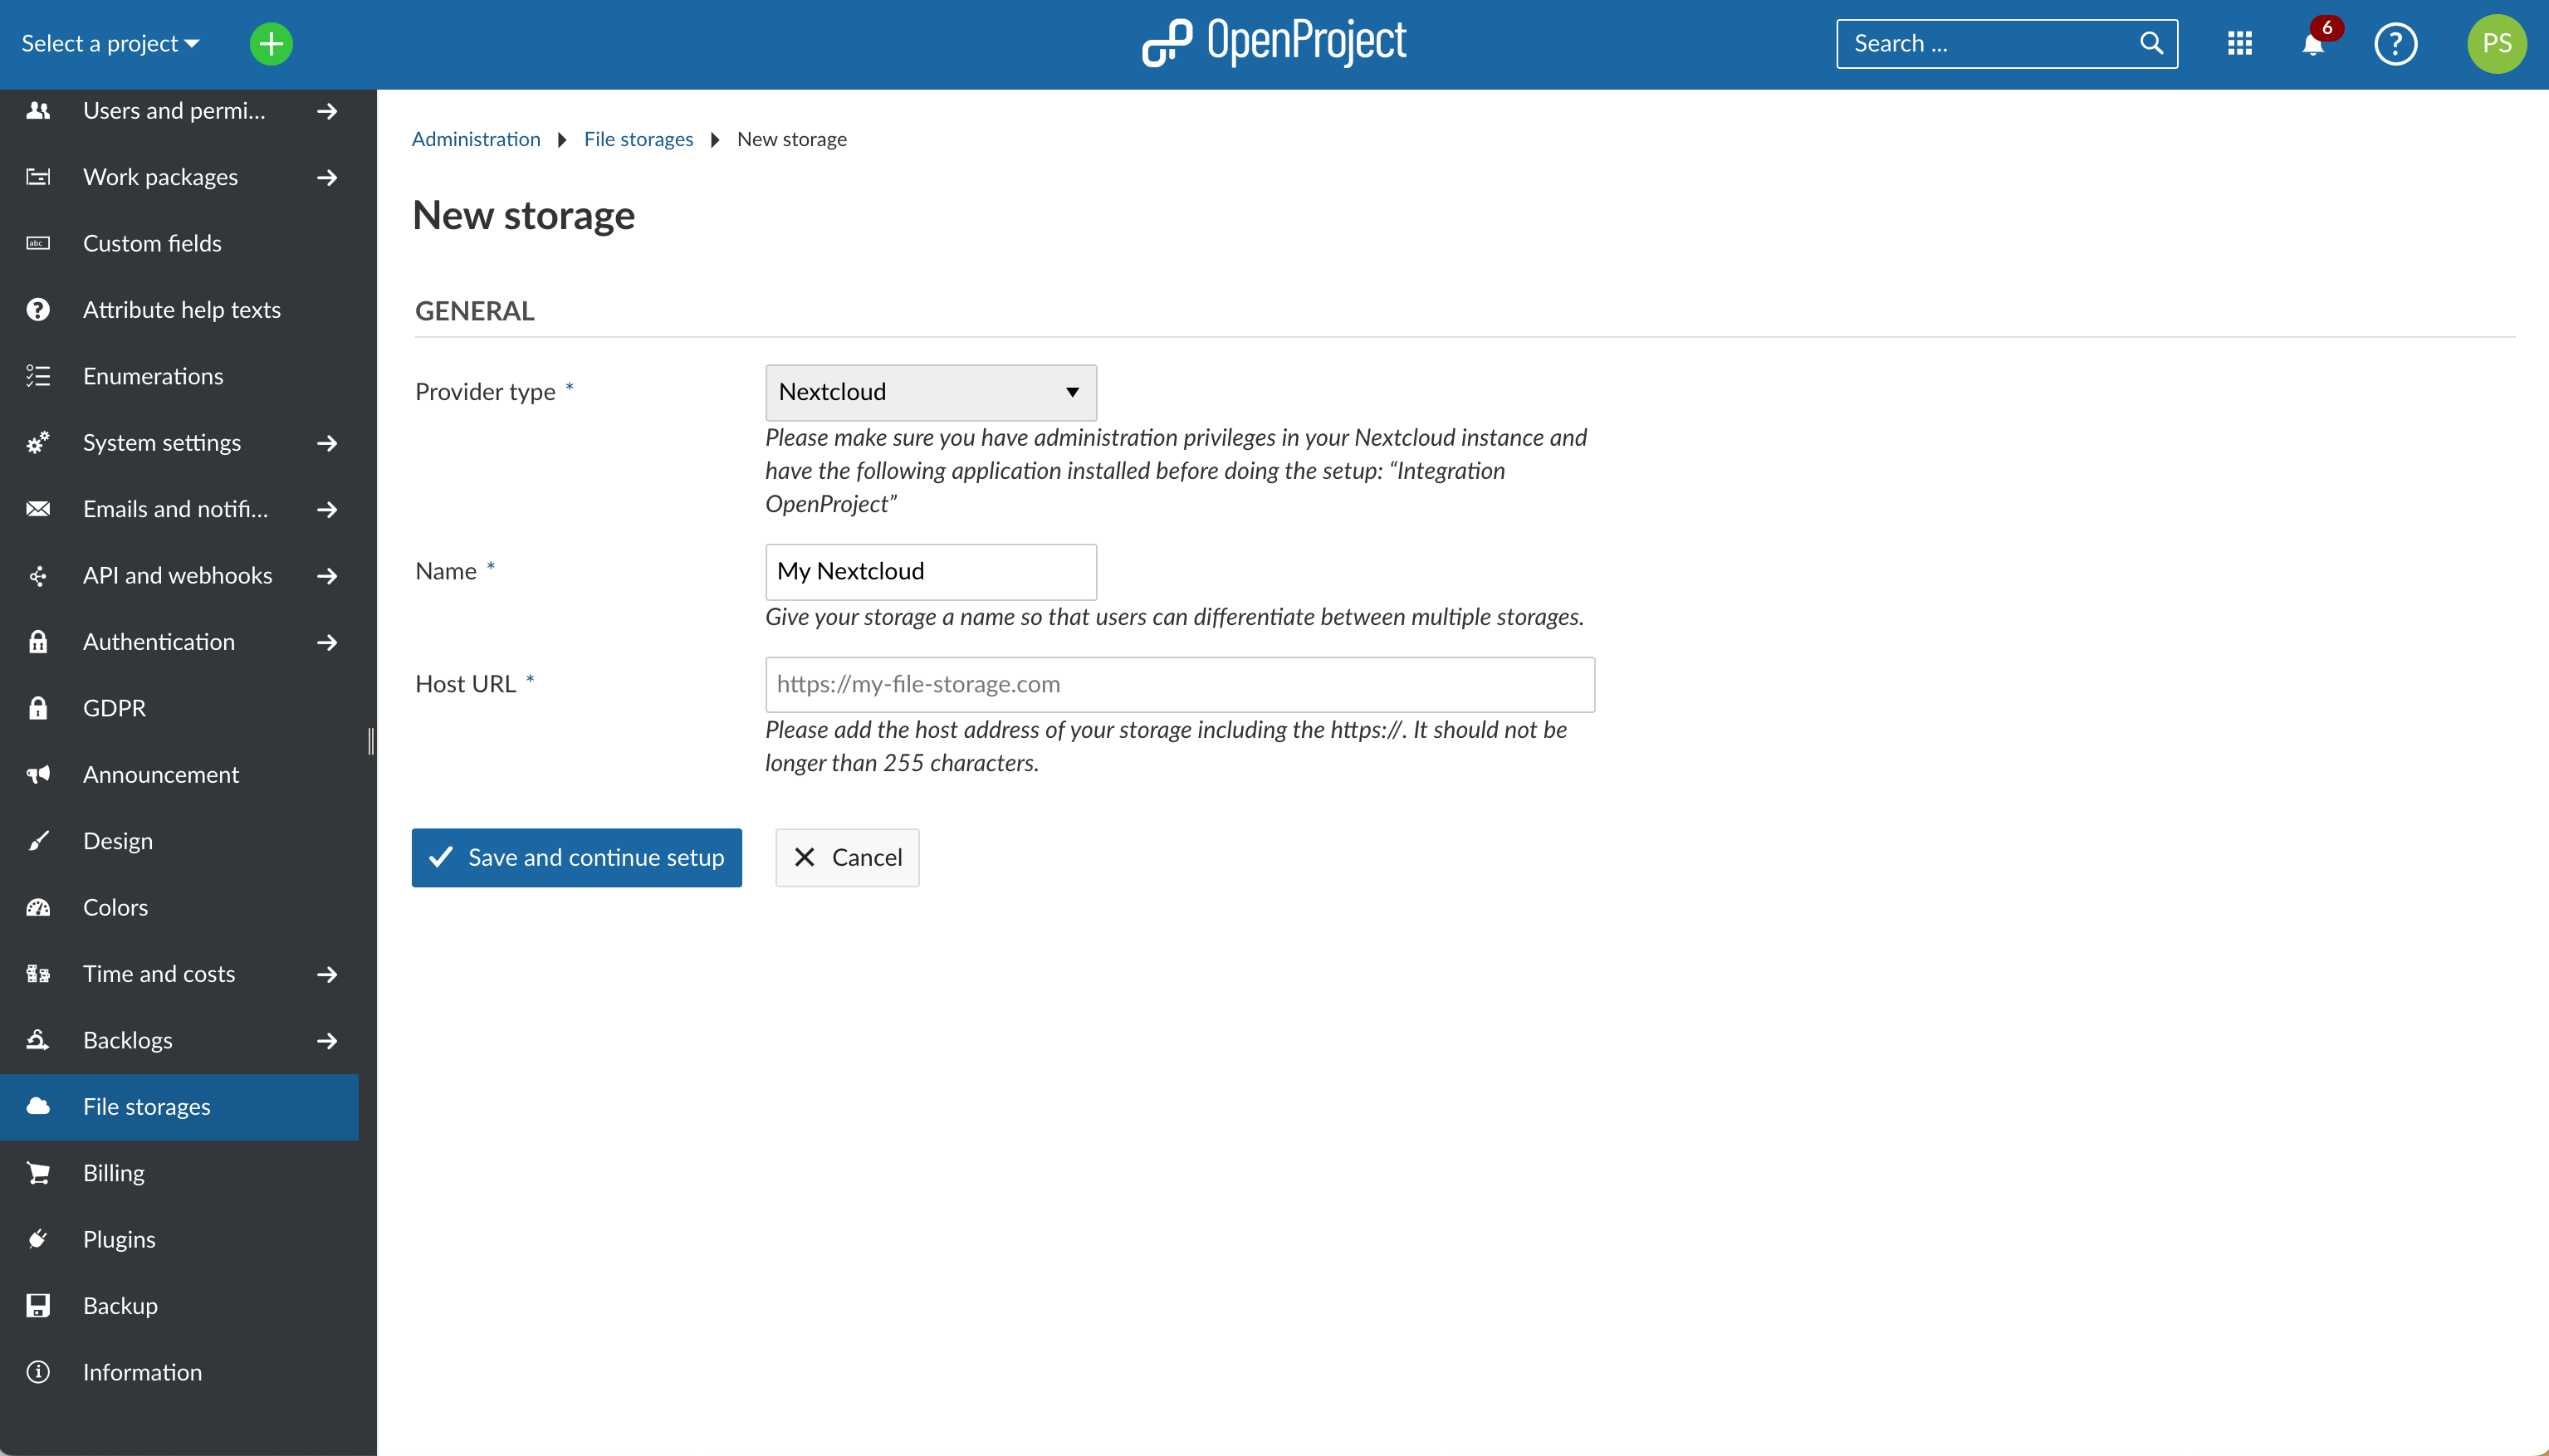
Click on Save and continue setup. Your new storage is now created, but before you can use it, you will need to exchange OAUth IDs and secrets between your Nextcloud and Nepenthes instances. You will do this in the next step.
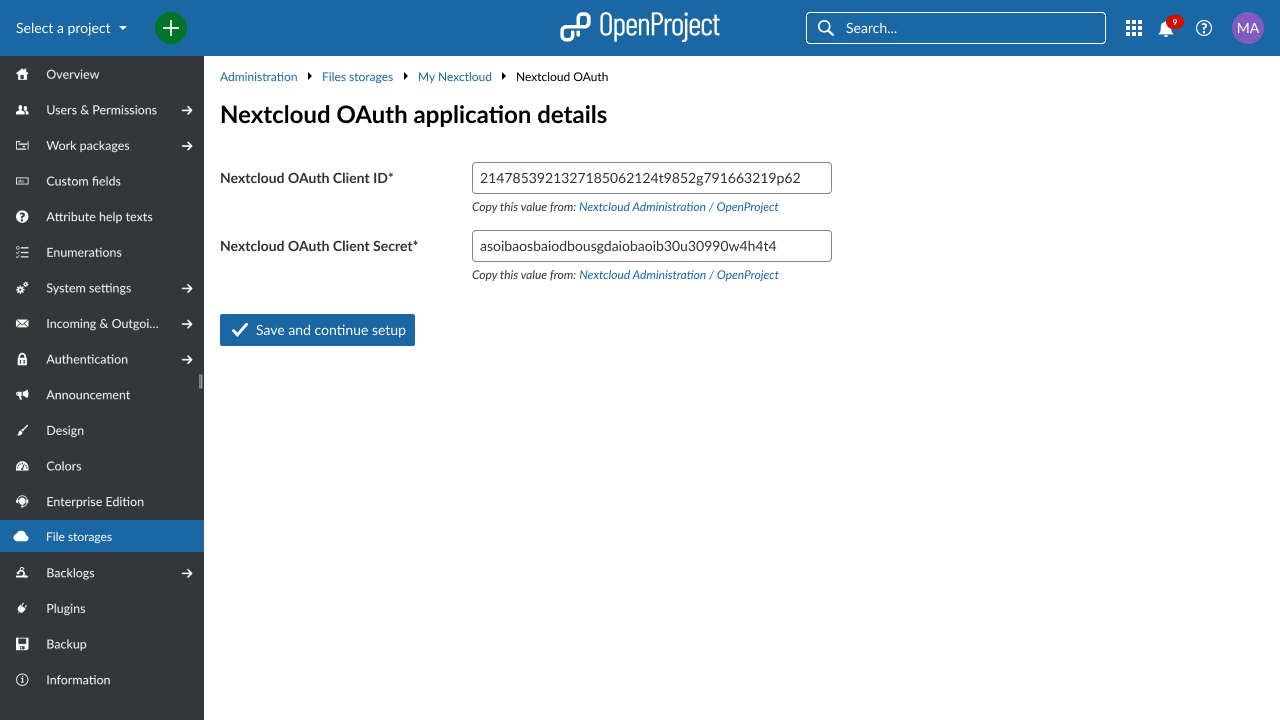
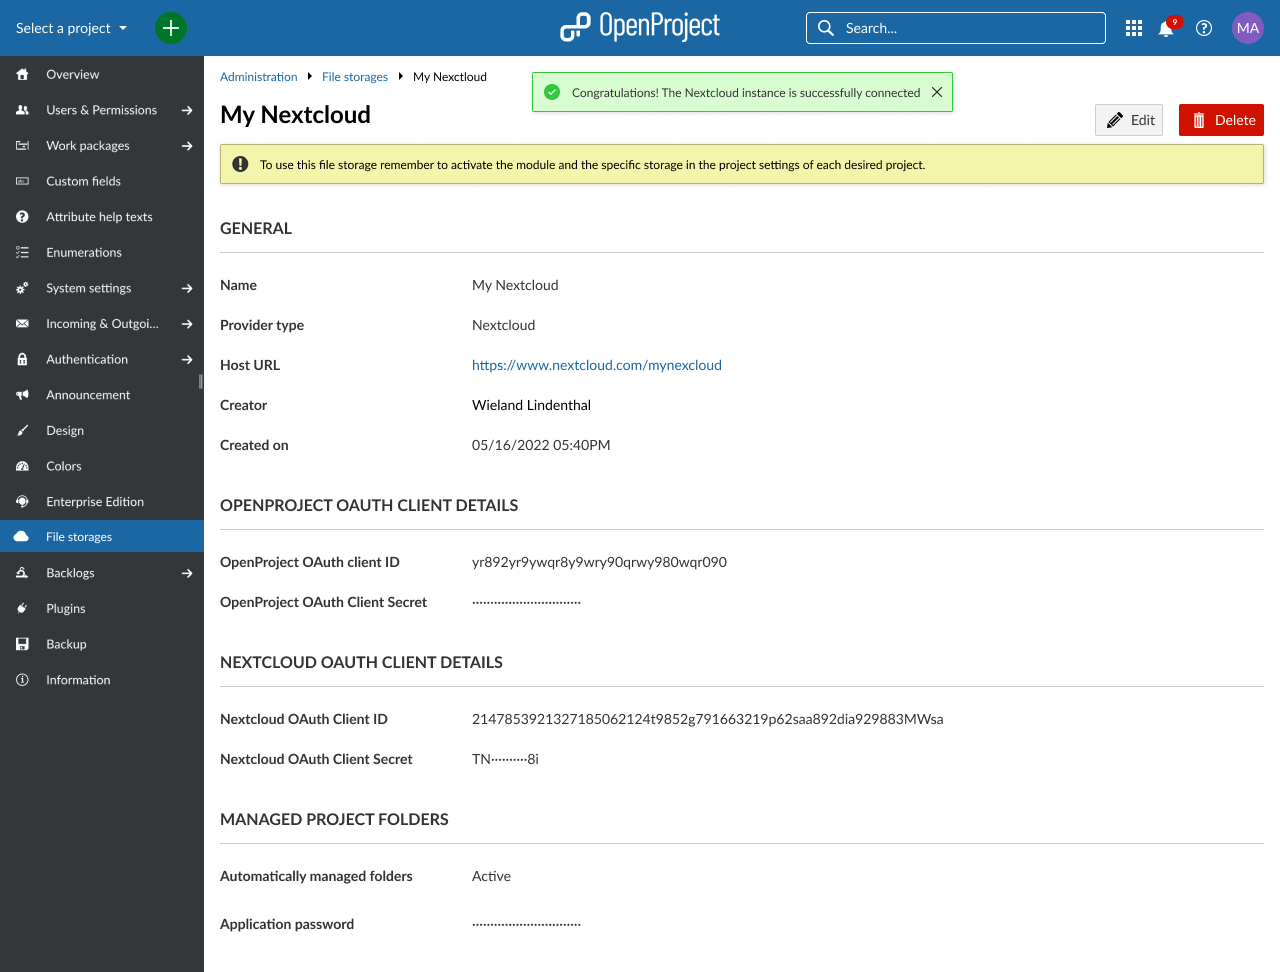
3. Enter Nepenthes OAuth values in Nextcloud settings
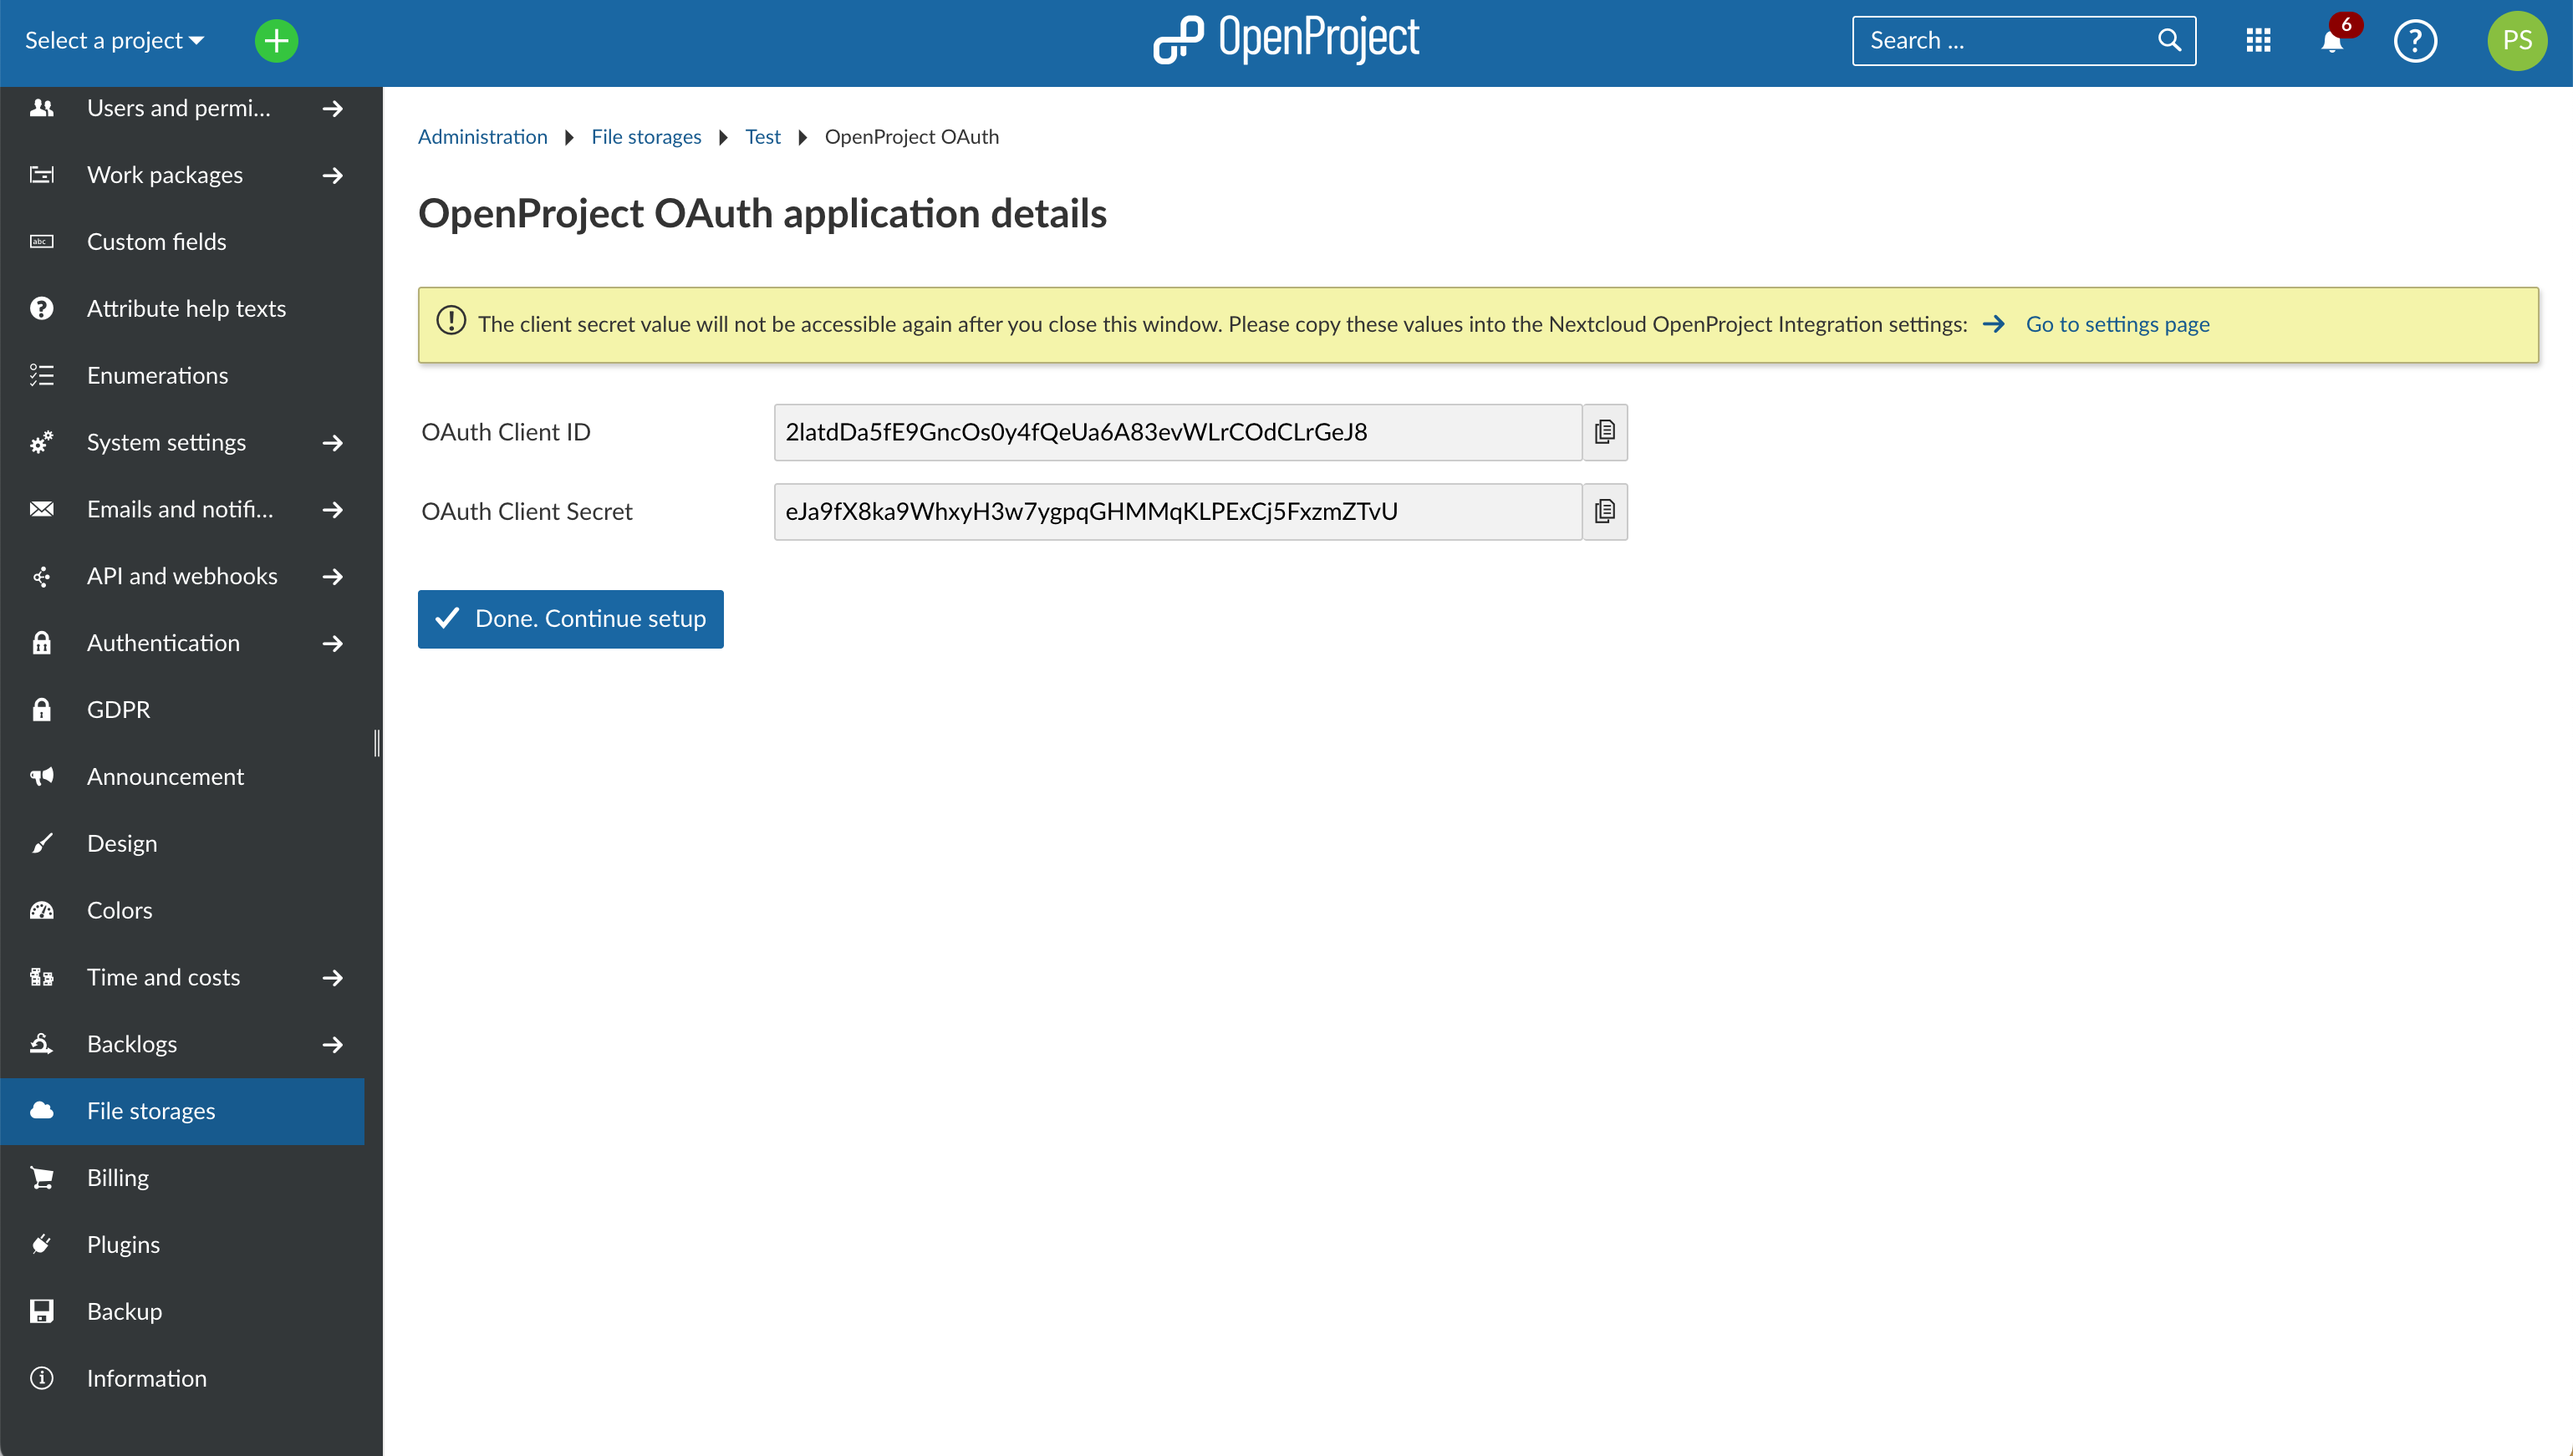
At this point, you will see a page titled Nepenthes OAuth application details.
Note that Nepenthes has automatically generated an OAuth client ID and a client secret. These values are needed to permit Nextcloud to connect to Nepenthes.
Important: These generated values are not accessible again after you close the window. Please do not navigate away from this page before copying them over to Nextcloud, as instructed below. Treat these values with care, as you would an important password. Please do not reveal them to anyone else.
Go back to the browser tab where you were configuring the Nepenthes Integration app. (We recommend you have two browser tabs open: the current one with Nepenthes and the former one with Nextcloud).
Copy the two generated values (client ID and secret) from the Nepenthes tab to the respective fields in Nextcloud, namely Nepenthes OAuth client ID and Nepenthes OAuth client secret.
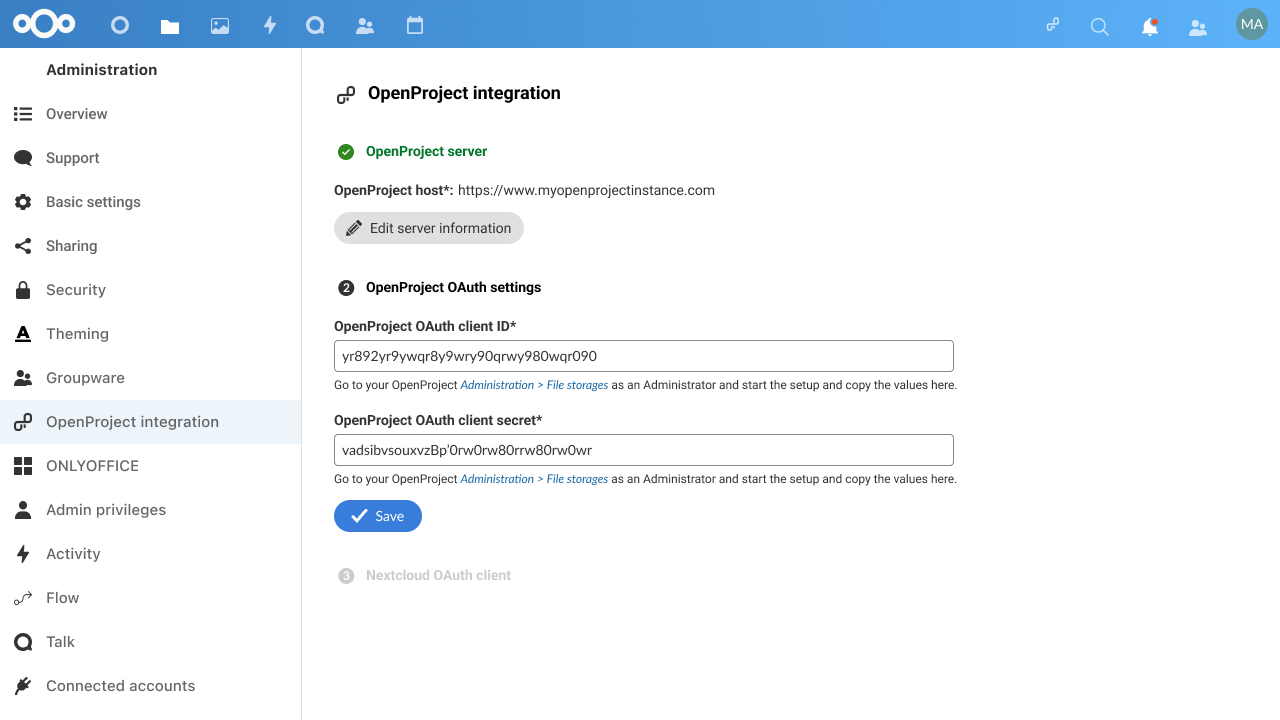
Once you have copied the values, click on Save to proceed to the next step.
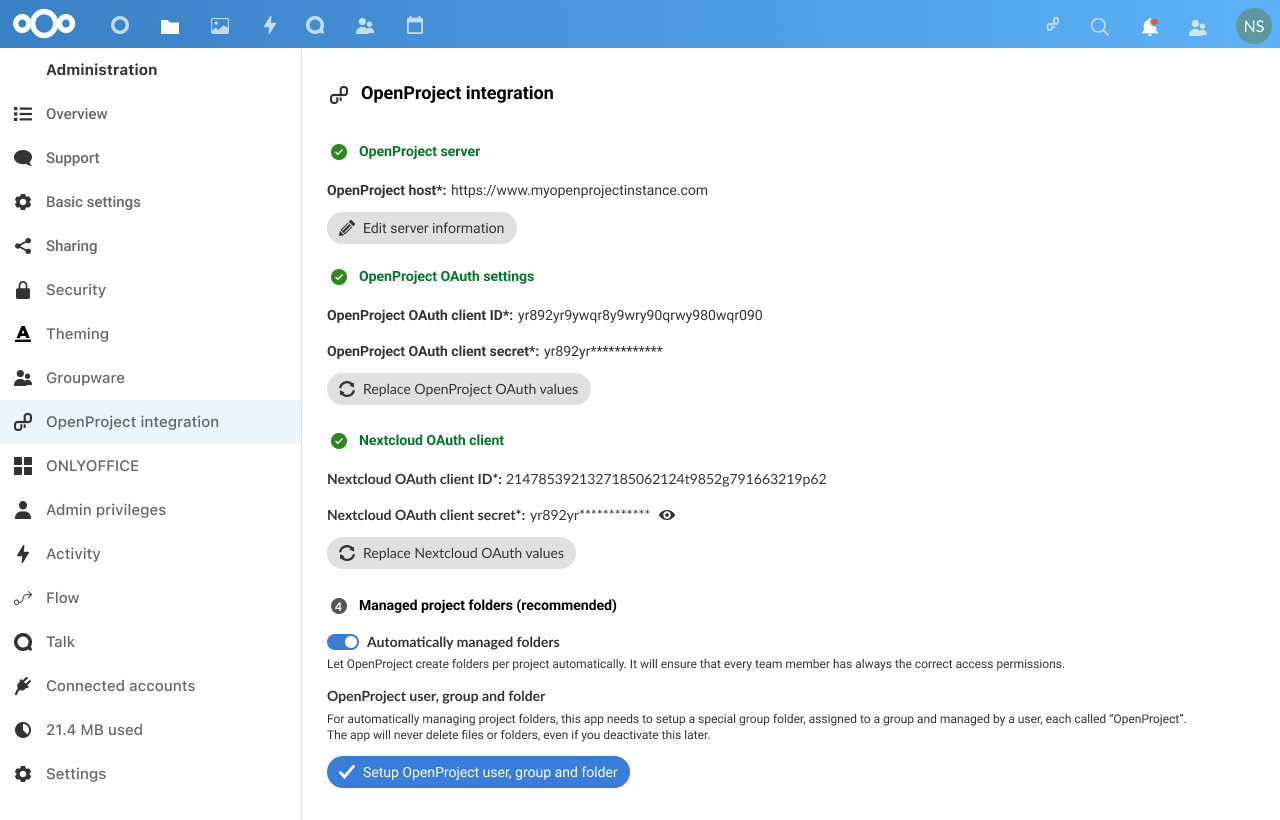
4. Enter Nextcloud OAuth values in Nepenthes
In the page that appears, you will see new OAuth values that are once again generated automatically, but this time by Nextcloud.
Nepenthes will need these values to be able to connect to your Nextcloud instance.
Much like in the previous step, you will need to copy these two generated values (Nextcloud OAuth client ID and Nextcloud OAuth client secret) and paste them into Nepenthes.
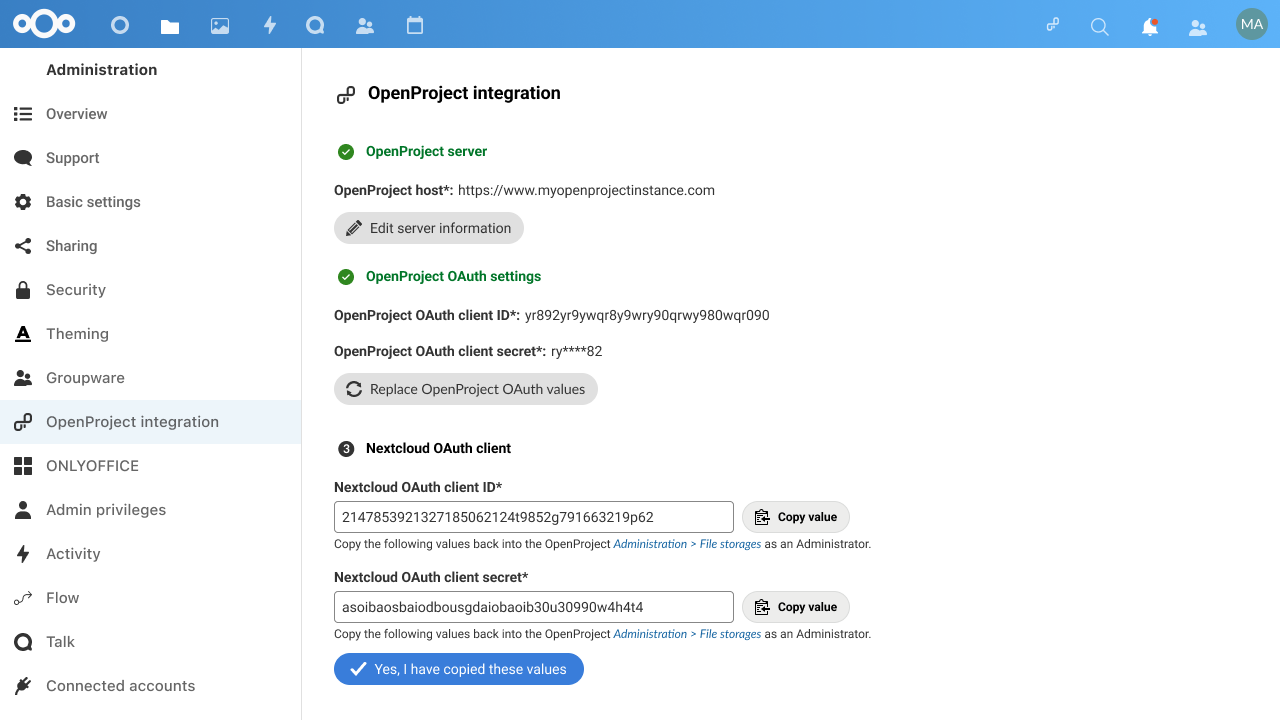
Navigate back to your Nepenthes tab and click on the Done. Continue setup button on the screen you previously left it at. You will now see a screen where you will be able to enter the Nextcloud values.
Once you have entered the client ID and client secrets on this page, click on Save and continue setup.
5. Automatically managed folders
As a last step, you will be asked if you want to use automatically managed folders. If you choose this option, Nepenthes will automatically create project folders in Nextcloud and manage permissions such that all project members always have the necessary access privileges. Unless you already have a particular folder structure in place, we recommend choosing this option.
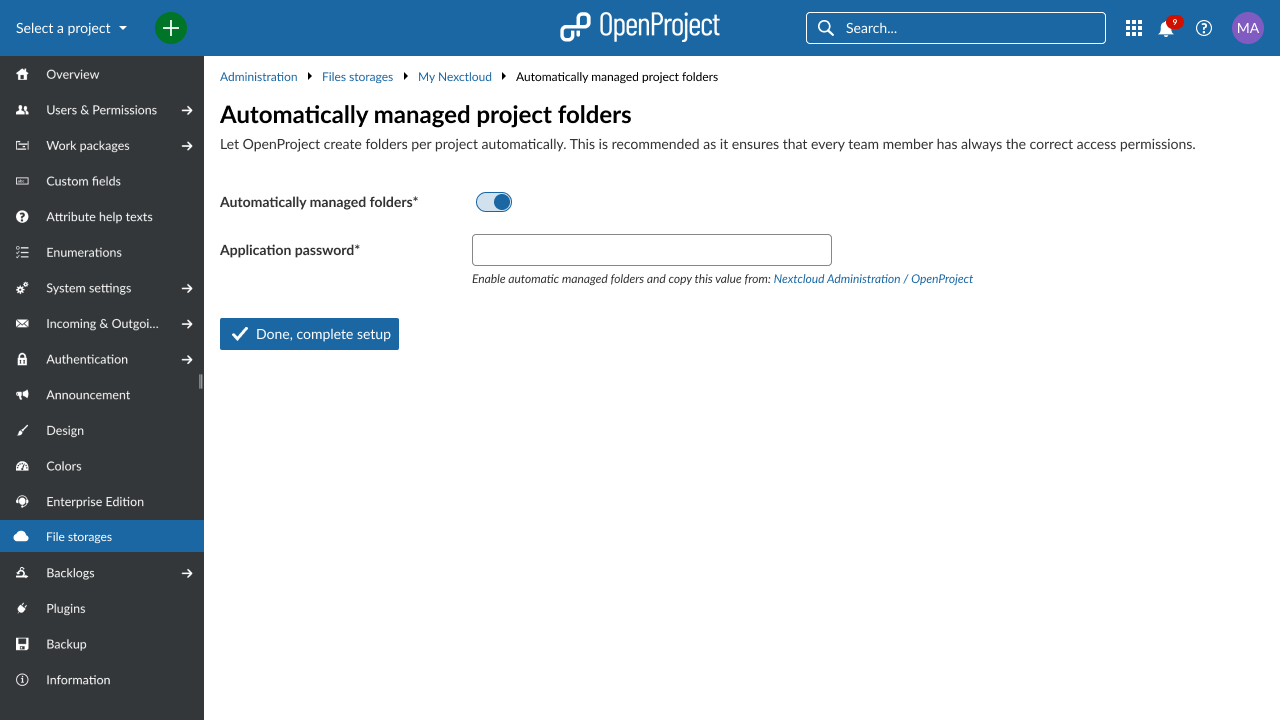
In case you want to use this functionality you will be requested to enter a password. Switch back to Nextcloud and click on Yes, I have copied these values. This will open the last step of the process in Nextcloud, where you can also select if you want to use automatically managed folders. Click on Setup Nepenthes user, group and folder to configure the folders and see the password. Once configured, you can copy the password back to Nepenthes.
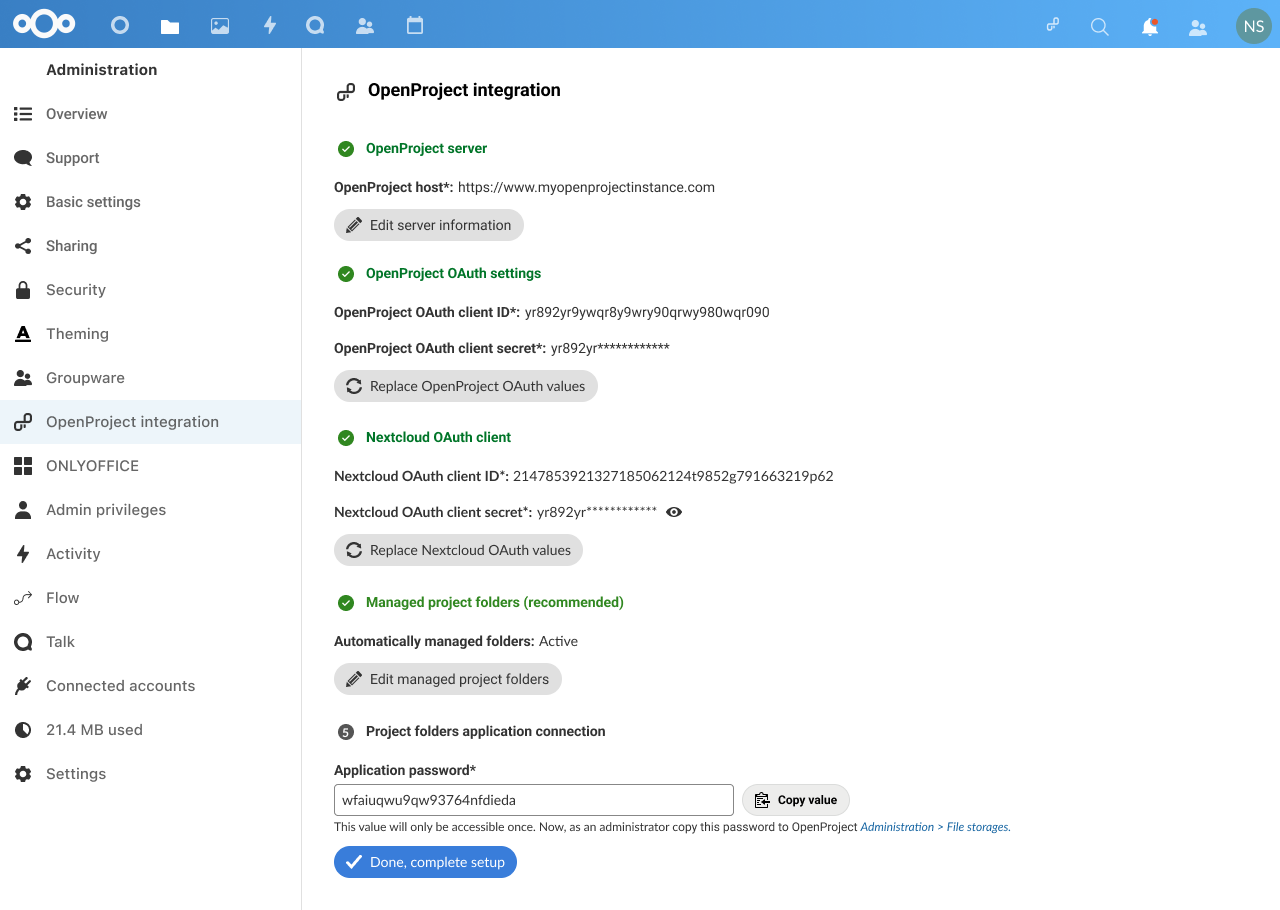
Important: You will need to install the Group folder app in Nextcloud in order to have Nepenthes automatically managed your Nextcloud folders. Each storage can only have one group folder with the same name.
At this point, you can click on Done, complete setup in both applications and your instance configuration will be completed.
The Nepenthes Integration page on your Nextcloud tab should also indicate that the integration is complete with three green check marks.
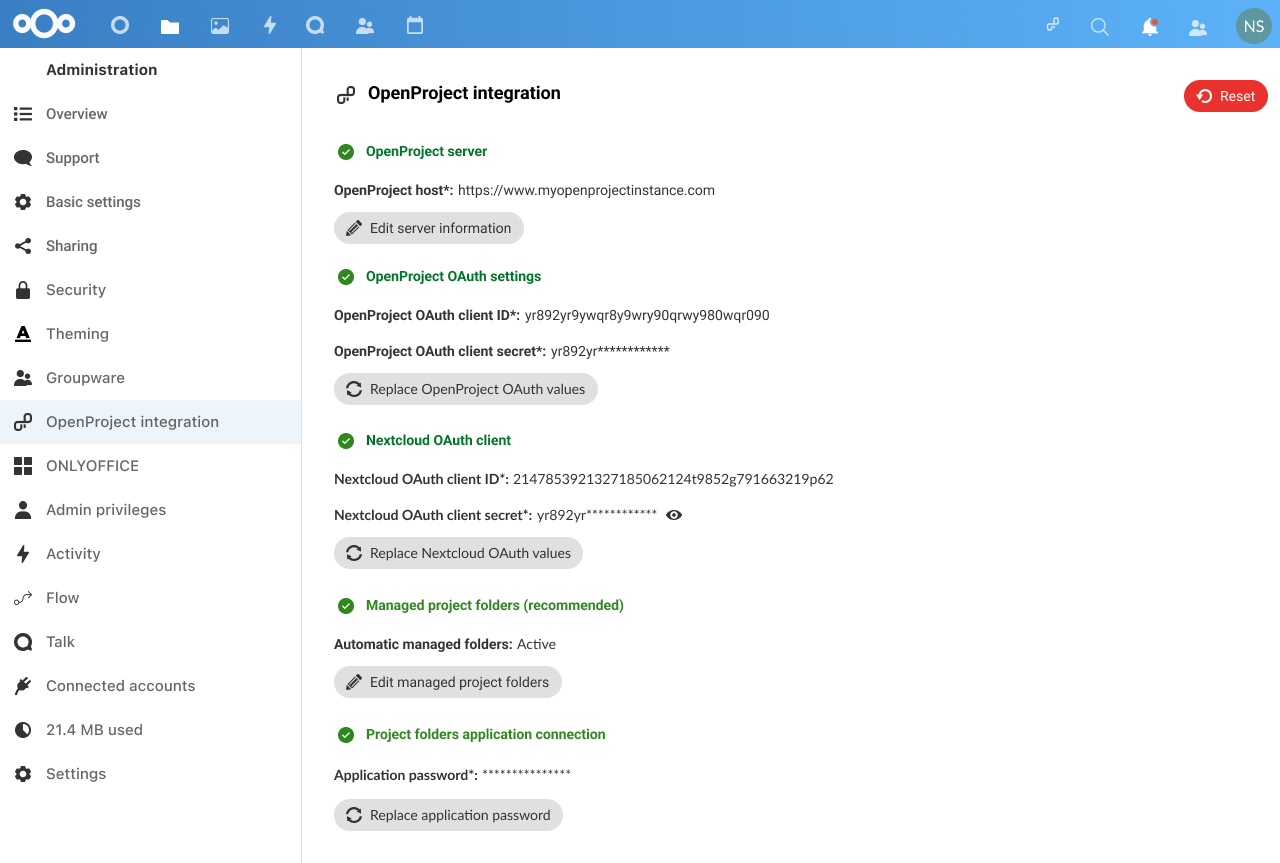
The integration is now complete, and your Nepenthes and Nextcloud instances are ready to share information.
Additional settings on this page also allow you, as an administrator, to define default settings for options that are available to each user. These can of course be overridden by a user to their liking:
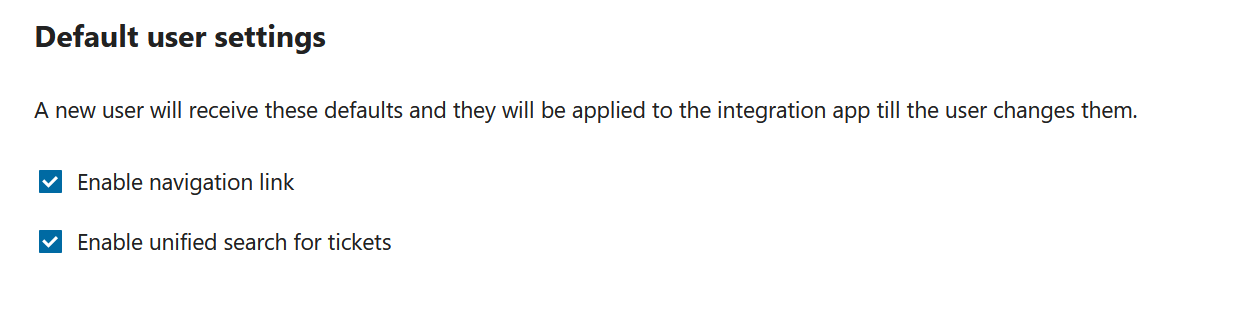
- Enable navigation link displays a link to the Nepenthes instance in the Nextcloud header
- Enable unified search for tickets allows users to search for Nepenthes work packages via the universal search bar in Nextcloud
6. Add your new Nextcloud file storage to a project
Now that the integration is set up, the next step is to make the Nextcloud file storage you just created available to individual projects.
To do so, navigate to any existing project in your Nepenthes instance and click on Project settings → Modules and follow the instructions in the Project settings user guide.
Note: For information on how to use the file storage (link Nextcloud user accounts at a user level, link files to a work package, view and download linked files, unlink files), please read our Nextcloud integration user guide.
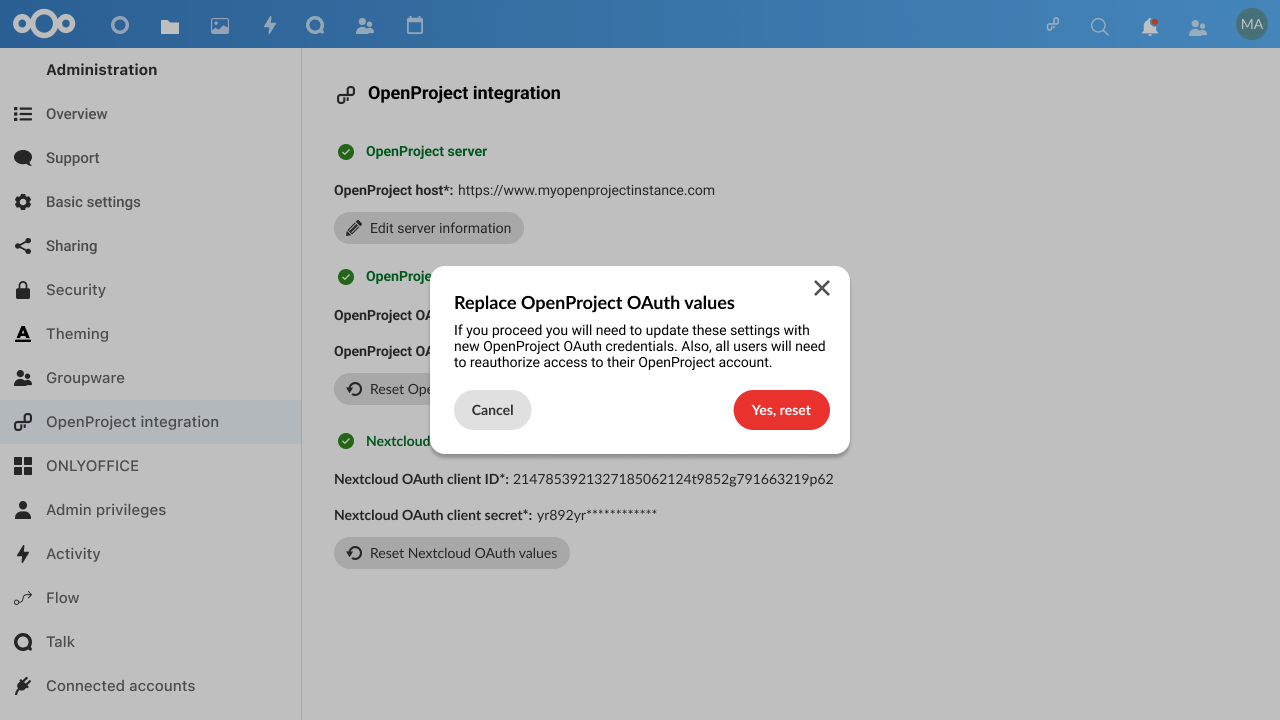
Reset OAuth values
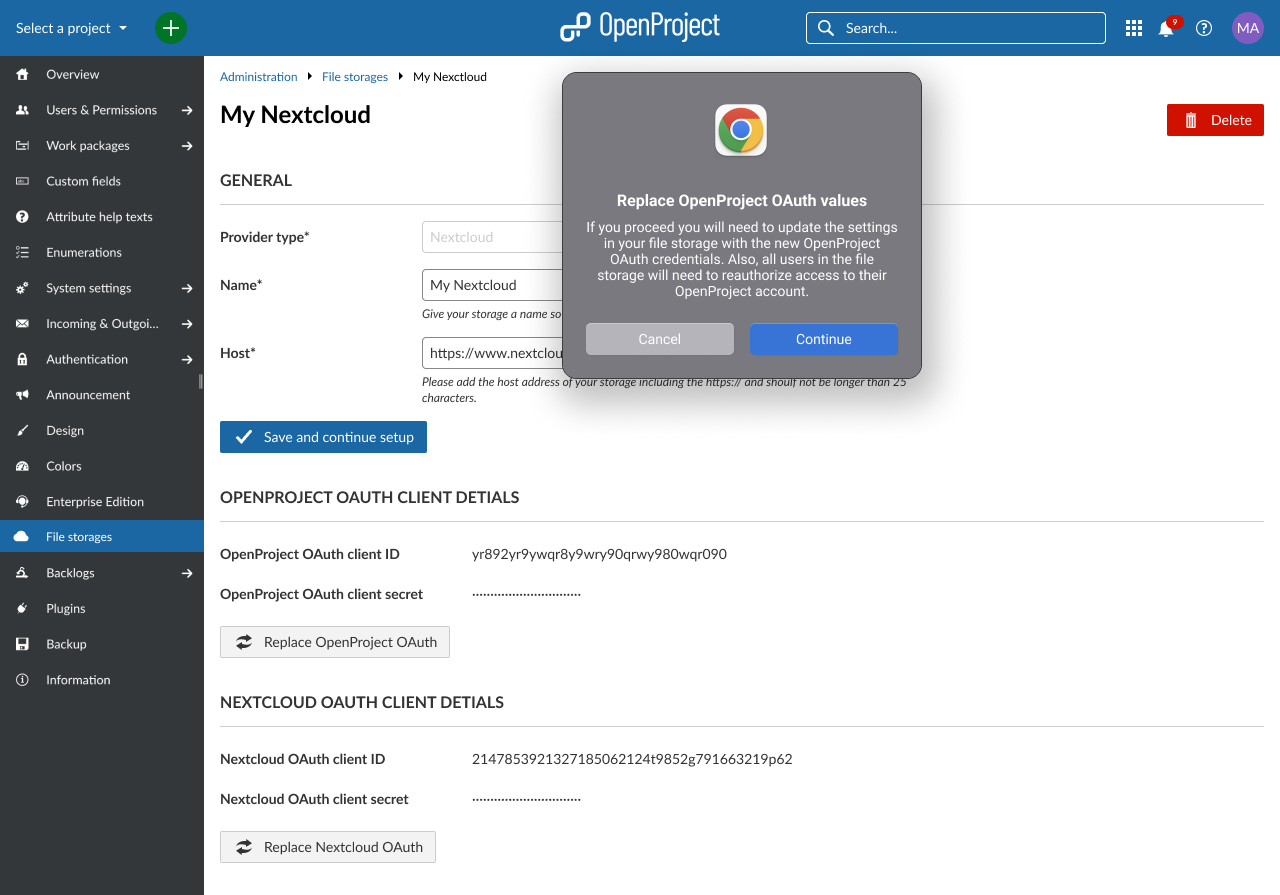
If you wish to reset OAuth values for any reason, you can do so on either side by clicking on the Reset OAuth values button (in Nextcloud settings) or the Replace OAuth values button (in Nepenthes admin settings).
Important: When you reset/replace these values, you will need to update the configuration with the new OAuth credentials from the side you are resetting. This will also require all users to re-authorize Nepenthes to access their Nextcloud account by logging in again.
Delete a Nextcloud file storage
You can delete a Nextcloud file storage either at a project level or at an instance-level.
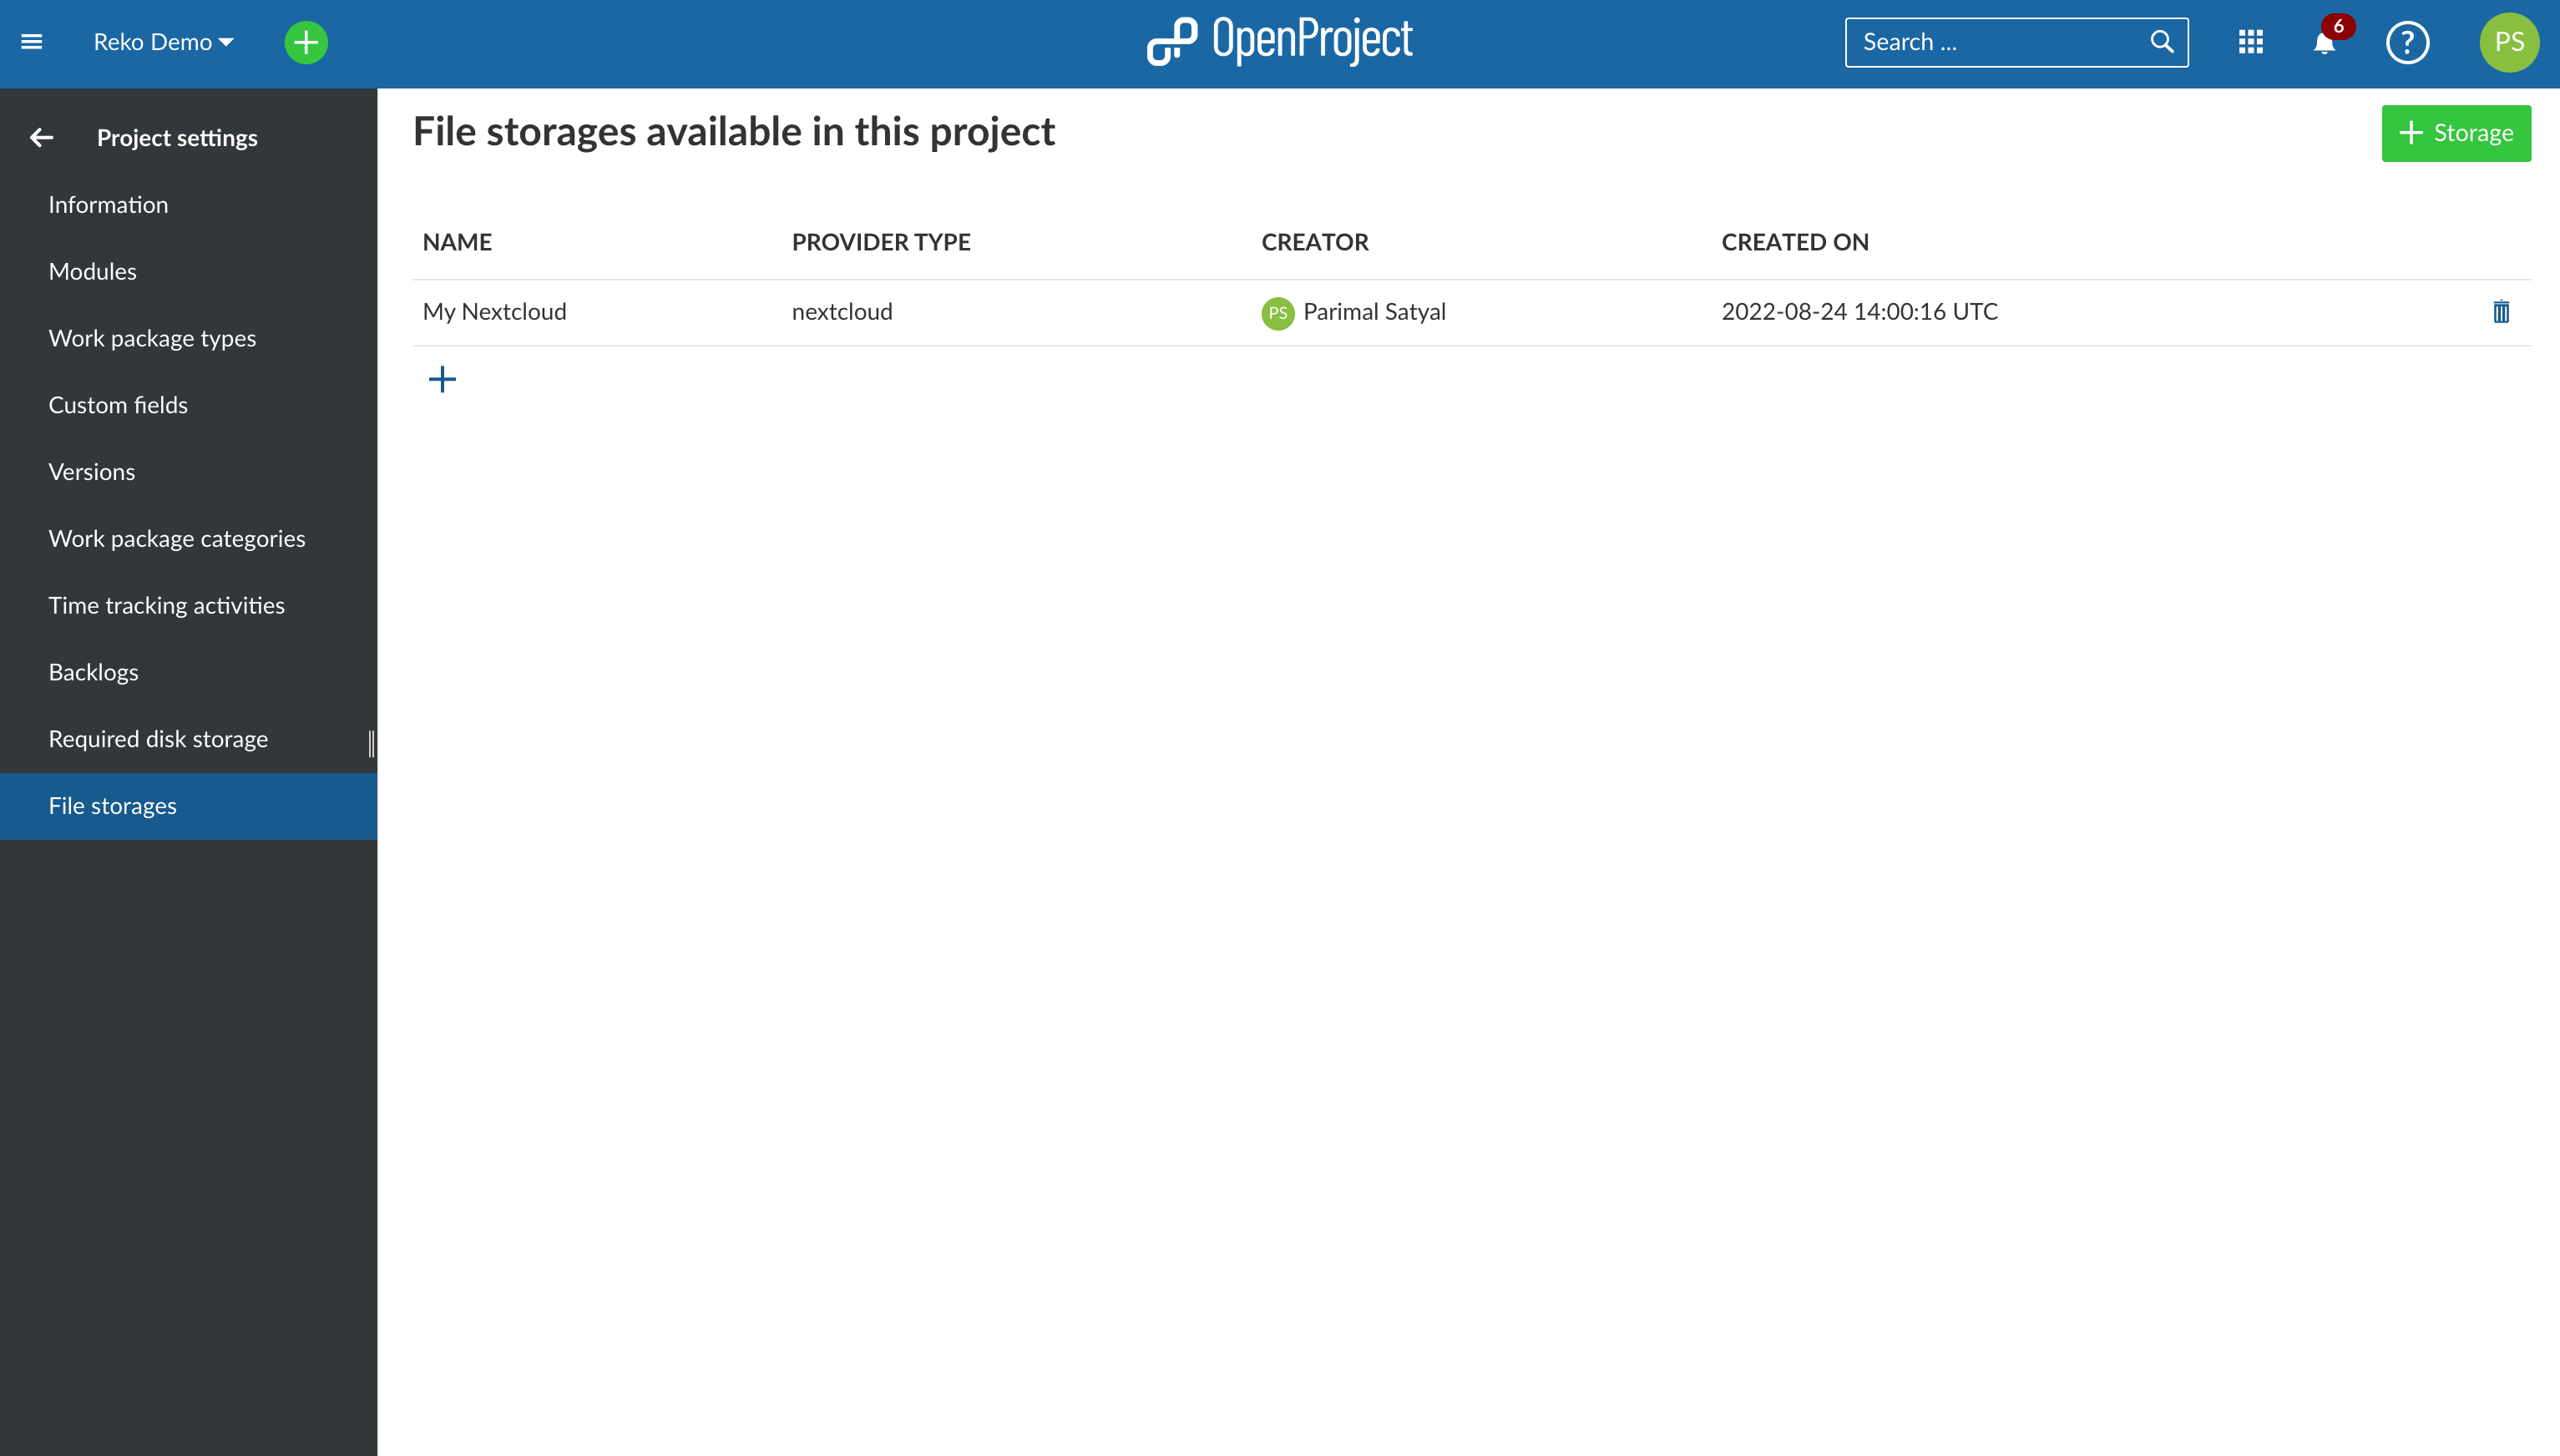
Deleting a file storage at a project level simply makes it unavailable to that particular project, without affecting the integration for other projects. Project admins can do so by navigating to Project settings → File storages and clicking the delete icon next to the file storage you would like to remove.
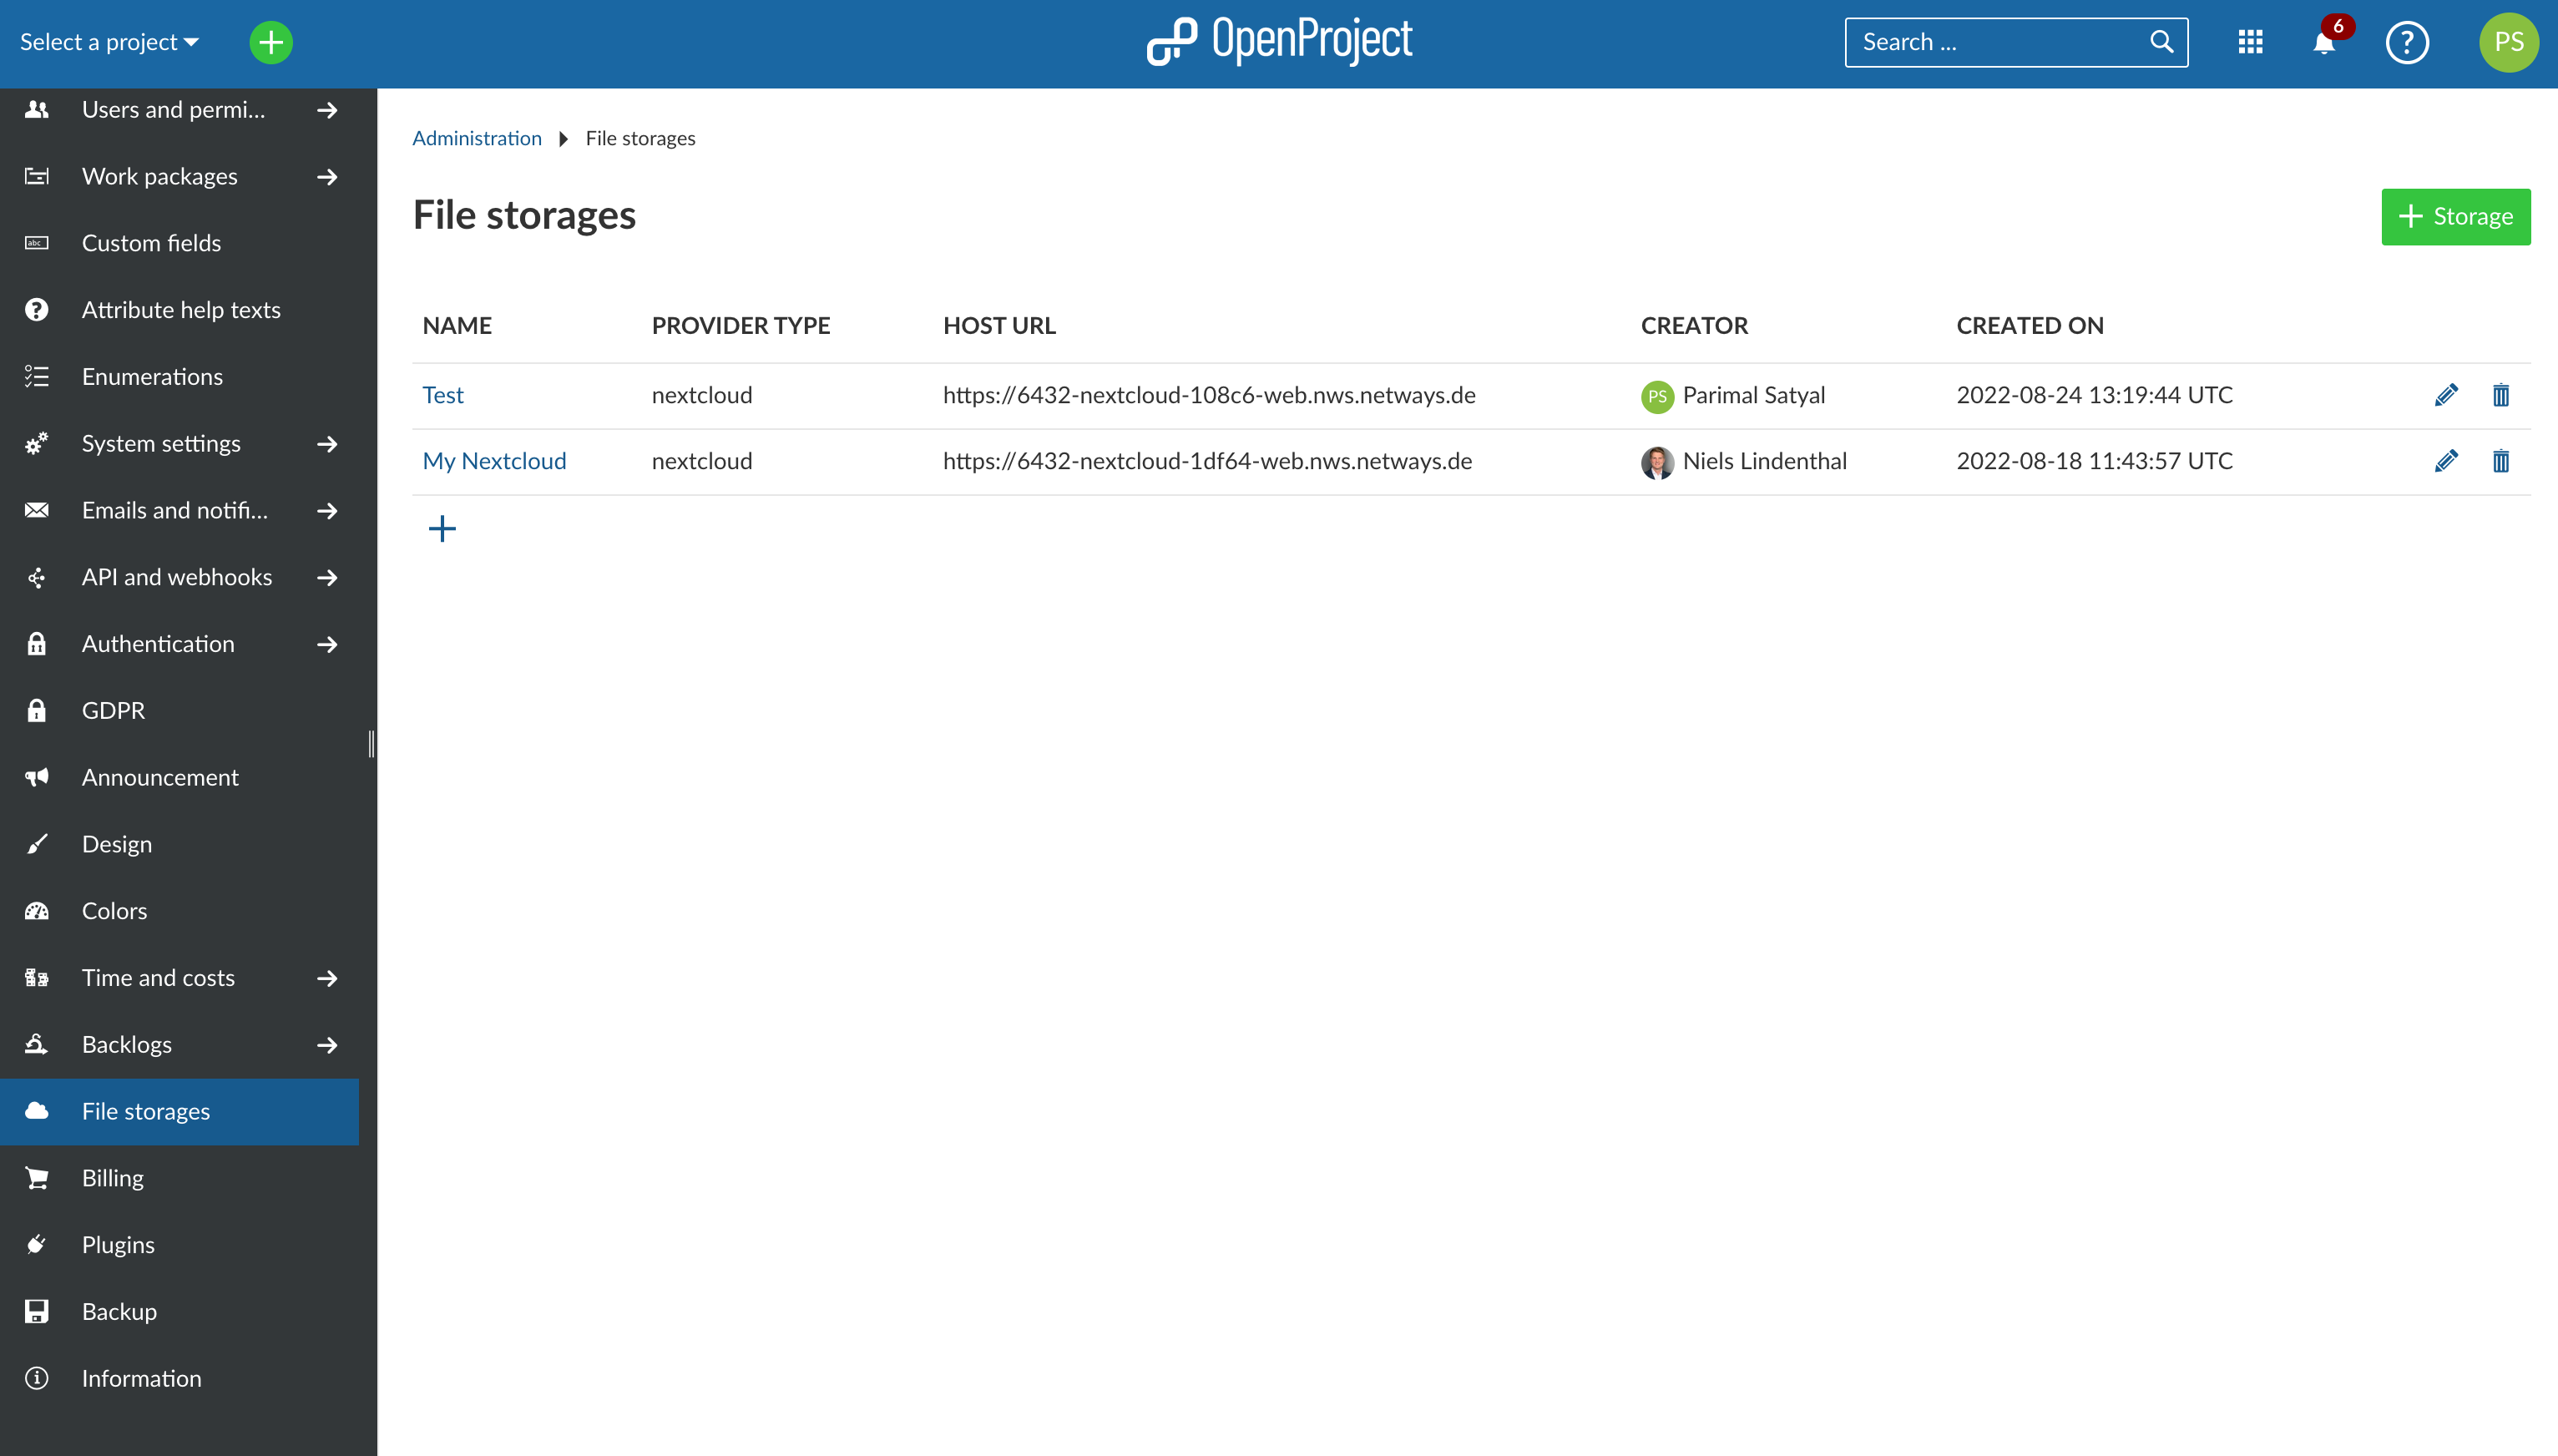
Deleting a file storage at an instance level deletes the Nextcloud integration completely and make it unaccessible to all projects in that instance. Should an instance administrator nevertheless want to do so, they navigate to Administration → File storages and clicking the delete icon next to the file storage they would like to remove.
Important: Deleting a file storage as an instance administrator will also delete all settings and links between work packages and Nextcloud files/folders. This means that should you want to reconnect your Nextcloud instance with Nepenthes, will need complete the entire setup process once again.
Using the integration
Once the file storage is added and enabled for projects, your users are able to take full advantage of the integration between Nextcloud and Nepenthes. For more information on how to link Nextcloud files to work packages in Nepenthes and access linked work packages in Nextcloud, please refer to the Nextcloud integration guide.
Troubleshooting
Setting up Nepenthes in Nextcloud
Error message "Please enter a valid Nepenthes hostname"
On Nextcloud inside the Nepenthes Integration App, when adding the Nepenthes host, it shows the error "Please enter a valid Nepenthes hostname". There are multiple reasons that can cause the error;
The host address could be wrong. Please check in a separate browser tab that the URL that you have provided is correct. Nepenthes should load.
If your Nextcloud and Nepenthes servers are both in a local network, it might be necessary to explicitly allow local remote servers in Nextcloud by setting a system configuration via your Nextcloud command line. This allows Nextcloud to connect to other local servers. Use the command
sudo -u www-data php occ config:system:set allow_local_remote_servers --value 1in order to enable the setting for Nextcloud.Your Nextcloud server does not have access to the Nepenthes server. To test the connection between Nextcloud and Nepenthes, you can use the following command on your Nextcloud server's command line:
shellcurl https://openproject.example.comIn case the
curlcommand above results in an error pay attention what it is telling you. Typical reasons for connection issues are misconfigured firewalls, proxies, or a bad TLS/SSL setup.
While using a self signed TLS/SSL certificate you receive "certificate verify failed"
Some administrators setup Nepenthes using a self signed TLS/SSL certificate with their own CA (certificate authority). That CA needs to be known on the Nextcloud server. On a Debian/Ubuntu based server, make sure you add the CA certificate for your Nepenthes certificate to /usr/local/share/ca-certificates and run sudo update-ca-certificates afterwards. Then Nextcloud's PHP code should be able to verify your Nepenthes TLS/SSL certificate when emitting HTTPS requests to your Nextcloud server.
Attention: Please do not confuse the CA for the Nextcloud server's certificate with the CA of the Nepenthes server's certificate which you might have provided in the Nepenthes installation wizard. They do not necessarily need to be the same.
While setting up Project folders
While setting up the project folders we create a new user, group and group folder named Nepenthes. At the time of set up the system expects either all of these entities to have been set up with proper permissions or none of them to be present. If one or more of these entities are present without required permissions, an error message will be displayed.
Error message "The user "Nepenthes" already exists"
On Nextcloud inside the Nepenthes Integration App, when setting up an Nepenthes user, group and folder, it shows the error "The user "Nepenthes" already exists". This error occurs if user Nepenthes exists but group Nepenthes and/or group folder Nepenthes doesn't exist, or they exist with broken permissions. To solve this problem refer to possible solutions in section Possible solutions to Project folders setup error
Error message "The group "Nepenthes" already exists"
On Nextcloud inside the Nepenthes Integration App, when setting up an Nepenthes user, group and folder, it shows the error "The group "Nepenthes" already exists". This can occur if group or group folder Nepenthes exists but the user Nepenthes doesn't exist. To solve this problem refer to possible solutions in section Possible solutions to Project folders setup error
Error message "The group folder name "Nepenthes" already exists"
On Nextcloud inside the Nepenthes Integration App, when setting up an Nepenthes user, group and folder, it shows the error "The group folder name "Nepenthes" already exists". This can occur if both group and user Nepenthes doesn't exist but the group folder Nepenthes exists. To solve this problem refer to possible solutions in section Possible solutions to Project folders setup error
Possible solutions to Project folders setup error
If you are facing any of the aforementioned errors while trying to set up the Project folders feature for the first time, or you don't care about the Nepenthes user/group/folder data then the easiest solution is to remove any of the created Nepenthes user/group/folder entities. Please follow the following steps:
Disable the Nepenthes Integration App Note: You need to disable the Nepenthes Integration App because user/group
Nepenthesis protected by the app, and it won't allow you to delete the user/group namedNepenthes. Disabling and enabling the app is safe. No app data will be deleted.Remove user
NepenthesRemove group
NepenthesInside the Group folders App (Administration settings → Administration → Group folders), remove group folder
Nepenthes. Caution: this step will delete all files in that folder. Make sure to make a copy if you want to keep these files!Enable the Nepenthes Integration App
Set up the project folders again
If you do care about the Nepenthes user/group/folder data then the conditions that bring the project folder setup to error state, and its possible solutions are as listed below:
- User
Nepenthesdoesn't exist. Please check if the user exists, if not create a user namedNepentheswith username and display nameNepenthes, some secure random password, email is not necessary. - Group
Nepenthesdoesn't exist. Please check if the group exists, if not create a group namedNepenthes. - User
Nepenthesis not a member of groupNepenthes. Please check the user is a member of the group, if not add the userNepenthesto the groupNepenthes. - User
Nepenthesis not group admin of groupNepenthes. Please check the user is admin of the group, if not make userNepenthesthe group admin of groupNepenthes - Group folder
Nepenthesdoesn't exist. If you don't have the Group folders App installed, please install and enable it. Inside the Group folders App (Administration settings → Administration → Group folders) make a group folder namedNepenthes. Add the groupNepenthesto the group folder with all the permissions i.e. Write, Share, Delete. Add userNepenthesto advance permissions list. - Group folder
Nepenthesis not assigned to groupNepenthes. Inside the Group folders App (Administration settings → Administration → Group folders) check if theNepenthesgroup folder has groupNepenthesassigned to it, if not add the groupNepentheswith all the permissions i.e. Write, Share, Delete. - Group
Nepenthesdoesn't have all the permissions for group folderNepenthes. Inside the Group folders App (Administration settings → Administration → Group folders) check if the groupNepentheshas all the permissions for group folderNepenthes, if not give groupNepenthesall the permissions i.e. Write, Share, Delete. - User
Nepenthesdoesn't have advanced permissions for group folderNepenthes. Inside the Group folders App (Administration settings → Administration → Group folders) check if the userNepentheshas advanced permissions for group folderNepenthes, if not add userNepenthesto advanced permissions list.
Note: The name
Nepenthesis case-sensitive, so should be in exactly that format.
While trying to delete or disable user/group "Nepenthes"
If you face an error while trying to delete or disable user/group "Nepenthes" then that's because user/group is protected by the Nepenthes Integration App. If you really need to delete the user or group follow these steps:
Disable the Nepenthes Integration App Note: Disabling and enabling the app is safe. No app data will be deleted.
Remove user
NepenthesRemove group
NepenthesInside the Group folders App (Administration settings → Administration → Group folders), remove group folder
Nepenthes.Caution: this step will delete all files in that folder. Make sure to make a copy if you want to keep these files!
Enable the Nepenthes Integration App
Setting up Nextcloud in Nepenthes
Error message "Host can not be connected to"
On Nepenthes inside the storage administration (Administration → File storages → + Storage), when adding the Nextcloud host, it shows the error "Host can not be connected to". There are multiple potential reasons that can cause this error message.
The host address could be simply wrong. Please check in a separate browser tab that the URL that you have provided is correct. Nextcloud should load.
Your Nepenthes server does not have access to the Nextcloud server. To test the connection between Nepenthes and Nextcloud, you can use the following command on your Nepenthes server's command line:
shellcurl -H 'OCS-APIRequest:true' -H 'Accept:application/json' https://nextcloud.example.com/ocs/v2.php/cloud/capabilitiesIf Nextcloud is setup correctly the response should look similar to the following. Pay special attention to current Nextcloud version, which in this example here is "24.0.6". At the time of writing this documentation the minimum version of Nextcloud is 22.
json{"ocs":{"meta":{"status":"ok","statuscode":200,"message":"OK"},"data":{"version":{"major":24,"minor":0,"micro":6,"string":"24.0.6","edition":"","extendedSupport":false},"capabilities":{"bruteforce":{"delay":0},"metadataAvailable":{"size":["\/image\\\/.*\/"]},"theming":{"name":"Nextcloud","url":"https:\/\/nextcloud.com","slogan":"a safe home for all your data","color":"#0082c9","color-text":"#ffffff","color-element":"#0082c9","color-element-bright":"#0082c9","color-element-dark":"#0082c9","logo":"https:\/\/nextcloud.example.com\/nextcloud\/core\/img\/logo\/logo.svg?v=0","background":"https:\/\/nextcloud.example.com\/nextcloud\/core\/img\/background.png?v=0","background-plain":false,"background-default":true,"logoheader":"https:\/\/nextcloud.example.com\/nextcloud\/core\/img\/logo\/logo.svg?v=0","favicon":"https:\/\/nextcloud.example.com\/nextcloud\/core\/img\/logo\/logo.svg?v=0"}}}}}If you do not get such a response check out what the
curlcommand above is telling you. Typical reasons for connection issues are misconfigured firewalls, proxies, or a bad TLS/SSL setup.
While using a self signed TLS/SSL certificate you receive "certificate verify failed"
Some administrators setup Nextcloud using a self signed TLS/SSL certificate with their own CA (certificate authority). The CA needs to be known on the Nepenthes server. On a Debian/Ubuntu based server, make sure you add the CA certificate for your Nextcloud certificate to /usr/local/share/ca-certificates and run sudo update-ca-certificates afterwards. Then Nepenthes's Ruby code should be able to verify your Nextcloud TLS/SSL certificate when emitting HTTPS requests to your Nextcloud server.
Attention: Please do not confuse the CA for the Nextcloud server's certificate with the CA of the Nepenthes server's certificate which you might have provided in the Nepenthes installation wizard. They do not necessarily need to be the same.
Error message "Host is not fully set up"
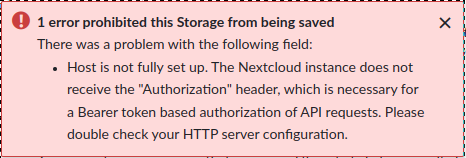
The integration Nepenthes with Nextcloud makes use of authorized HTTP requests between the two servers. The HTTP requests contain a Authorization header, containing a Bearer access token. Sometimes Nextcloud installations are not fully setup and the HTTP server strips the Authorization header, with the consequence that Nextcloud does not know which Nextcloud user is requesting. Run the following command on the command line of your Nepenthes server to check that your installation is complete
curl --location --request GET 'https://nextcloud.example.com/index.php/apps/integration_nepenthes/check-config' --header 'Authorization: foo'If Nextcloud setup correctly the response should look like the following
{"user_id":"","authorization_header":foo}If not, first verify that the app Nepenthes Integration is installed.
If that is the case verify that the mod_rewrite is activated on the Nextcloud server.
To activate mod_rewrite the following commands can be used on the Nextcloud server:
sudo a2enmod rewrite
sudo systemctl restart apache2
If that also not work please check the instructions for setting up pretty URLs in Nextcloud. This usually also resolves the issue of stripped Authorization headers.
Project folders are not created or you do not have access
You have setup the Project folder in both environments (Nextcloud and Nepenthes), but you cannot see any folder named Nepenthes in the root directory of Files app in Nextcloud.
Check if Nepenthes's background workers are running. These workers create these folders and set the correct access permissions per user. You have two options for verification:
a. If you have root access to the Nepenthes server where your worker should be running, check if the worker processes are in fact present:
ps aux | grep jobThe result should show lines containingbundle exec bundle exec good_job startb. If you don't have root access to the Nepenthes server then you can check the following URL in your browser:
https://<your-openproject-server>/health_checks/all(please insert the domain name of your Nepenthes server). If your background workers are running, you should see a line like thatworker_backed_up: PASSED No jobs are waiting to be picked up.Ensure that your project is setup correctly:
In your browser navigate to the project for which you want the Project folders feature to be working.
In the Project settings, make sure that:
the File storages module is enabled
the correct storage is enabled for that project
that Project folders setting is set to "New folder with automatically managed permissions"
Ensure that your user is fully set up: Nepenthes needs to know your Nextcloud user ID so that it can give your Nextcloud account the correct access rights to the project folder. That ID is obtained when you log into Nextcloud from within Nepenthes.
- To check: navigate to any work package in that project , open the Files tab and make sure that you are logged into the Nextcloud storage. If you are not logged in, you should see a Log in button. Click that button and follow the instructions on the screen.
If your Nepenthes account is not an admin user, you need to make sure that your user is a member of the project and that your role has at least the permission to
Read files. To check that the permissions for your role are correctly set-up you need to have an admin account or contact your administrator. In the section File storages at least the permission toRead filesneeds to be checked.If you changed anything in the steps above, please wait up to 30 seconds. If the background workers are working fine then you should see the project folder.
If none of the aforementioned steps worked, check whether your network connection is fine:
Login into your Nepenthes server via the command line interface. If you have multiple servers, chose the one that has the background workers running.
Test the network connection from this server to your Nextcloud server. All you need is the Nextcloud host name and the Application password. You received the application password at the end of the setup of the app Nepenthes integration in Nextcloud.
If you do not posses the application password anymore, you can reset it. Make sure not to forget updating the settings of the file storage in Nepenthes accordingly. The following cURL command should respond with an XML containing details for the Nepenthes user (Please make sure to use the right application-password and Nextcloud host name):
shellcurl -u 'Nepenthes:<application-password>' https://<nextcloud-host-name>/ocs/v1.php/cloud/users/Nepenthes -H 'OCS-APIRequest: true' -v`